How Men of Quality Resolve Differences

How Men of Quality Resolve Differences
Pudel and Peper attacks - an ugly but inevitable part of any 17th C. British Civil War, "Oh! The Shame of it All!"

Sunday, December 29, 2019

OHW Symposium: Scenario 8 Analysis, p.2

The problems presented in the first part of this analysis of One-Hour Wargames scenario #8 are here [CLICK]. They present firepower and skirmish Unit limitations that result in restricted use of the wood which is the key to taking the hill.

Limited Woods Access
In all the early six sets of rules, access to the woods is provided by auxiliary Units that are only available in variable amounts of 0-2. No other Units are allowed to enter woods.
- If either Red or Blue has 1-2 and the other side has none, he is poised to exploit the wood to his advantage.
- If both have Skirmishers, then the wood becomes a combat zone, probably favoring Blue who will have more Units that can attack it faster; this happens with later period rules.
- If neither side has Skirmishers, then the wood becomes an obstacle to both movement and line of sight. Ultimately, this should help Red more than Blue since it slows down the attack.

Limited Firepower
In all the early six sets of rules, shooting is provided by auxiliary Units and the core 1/2-2/3 of the force is Infantry with no firepower or limited firepower [in Pike and Shot they can run out of ammo]. The best one can do is the Medieval rules, with two d6+2 Archers, I guess representing the best Crossbowmen or Longbowmen available. These can have a gatling-gun like effect if you don't introduce an ammo limit mechanic.

On to the Later Period Rules
Now we will advance in history to the last three sets of rules; American Civil War, WWI [called "Machine Age"] and WWII. There is now parity on both sides, i.e. neither is handicapped by having few or no Units that may occupy the wood. In fact, all three eras have as their basic Unit Infantry that provide solid firepower at D6 or D6+2 and are able to enter the wood.

The wood itself and the hill immediately behind are still, IMHO, the most crucial terrain pieces to control - they anchor the East hill flank while the board edge anchors the West flank. The wood blocks Line of Sight, especially important against Artillery and Mortars, and ATGs which are deadly to Tanks. However, if Red has Tanks, he may want to consider using one on the hill as Tanks in the WWII rules get a cover benefit of halved Hits due to being hull down upon the hill.

Given this situation of parity, the best attack largely depends on Red's selection of defending Units and if he chooses to occupy the wood. For reasons known only to himself, Red may choose to put two Artillery or Cavalry on the hill, or two Anti-Tank Guns or Mortars - support Units unable to occupy the wood and with various limitations in their effectiveness. Meanwhile, the force must be made up of 3-4 Infantry, which are the best to hold the hill if not always the best to attack it.

My thought is an attack from the East usually has the best chance of success. The three attacking Units mass to destroy at least one defender before the Red reinforcements arrive. If the wood is occupied by Red, then the Red Unit in the woods should be destroyed. If Red concedes the wood, then Red will gain at least a turn as he uses the Wood as his own screen from incoming Blue Units and their firepower, but loses the wood.

While Blue's seizure of the wood doesn't take the hill, it is a good start along with destroying one Red Unit. There will only be one Red Unit left on the hill as two reinforcements race to the rescue. Red's only alternative is to retreat the most damaged unit off the hill, out of Line of Sight, but it may permit Blue to actually get up onto the hill. Again, depending on how you handle line of sight, being on the hill may be dangerous as it can be seen by many Units.

Below, Red has ATG and Infantry Units on the hill [platoons, per the rule explanation]. Incoming will be three Blue Infantry Units, on the road. Depending on your rule mods, you may allow Red to dig these units in, or have an overwatch capability.

Red Player Turn 1, Red Infantry occupy the wood. Depending on your Line of Sight rules, they may be able to see and be seen. The tactic and the mechanic are largely up to the player. In my WWII rules, Up the Blue!, I require Units to be touching the edge for mutual unlimited LoS to distant enemy; but if within the wood the mutual LoS is limited to 3", or Close Range.


Blue Player Turn 1, Infantry advance as quickly as possible. A tank Unit here would be useful. Mortars are sometimes useful. The ability of Infantry to Spot for the Mortar becomes a critical part of the Line of Sight mechanic you decide to use.


Red Player Turn 2, Red Infantry open Fire. Depending on your rule mods, you may allow them to go into overwatch mode, or dig in instead. I offer both options with my rules. Here, they have set up on the edge of the wood where they get cover, which give them halved Hits, and are already within 12" their Range. Of course, the reverse is also true.


Blue Player Turn 2. Two Infantry in position. Under original rules, two turns of shooting will have one of these Units at almost 50% Hits given average rolls. It is possible for all of them to have deployed and shooting on Turn 2, just from farther away. This would cause about 10 Hits a turn, eliminating the Unit in the woods on Turn 3. I chose to advance a bit farther.


Alternative plan - end of Turn 2, with Blue moving to occupy the wood while Red remains on the hill, taking no Hits due to range and LoS issues.


Turn 3, Red and Blue infantry will get into Firing Range. Red reinforcements will arrive.


Alternative Turn 3-4, has Blue bringing in ATGs to block Red reinforcements. Red chose two Infantry for the hill, so if Blue had a Tank Unit, it would do nicely for a frontal attack supported by Infantry in the wood. There are numerous combinations, of course, and ATGs, Mortars and Tanks are all support Units, and none are guaranteed to be in your force altho you will have at least 1-2 types, any of which could be quite useful.


You may recall from last post that if Blue has a substantial Firepower advantage, a swift frontal attack from the South using the wood to secure his right flank is a good plan. Some examples might be Infantry attacking the wood while Tanks attack the hill with Mortar support. An unusual plan might have two Mortars supporting an attack by one Infantry against two Infantry or ATGs. Either of these can work as two Mortars can almost knock out a Unit every other Turn.

Modifications to the scenario are easily made. Key to the plan of both sides is the arrival of reinforcements. You may tweak or randomize the arrivals to keep this scenario fresh. The present arrival rates and forces available are:
- Turn 1: Red 2, Blue 3 Units. A 3-2 advantage to Blue until Turn 3 [2 Turns].
- Turn 3: Red +2 Units, a 4-3 advantage to Red until Turn 4 [1 Turn].
- Turn 4: Blue +3 Units, a 3-2 advantage to Blue until Turn 6 [3 Turns].
- Turn 6: Red +2 Units, both sides now equal.
The pressure is still largely upon Blue - Red starts with a won game and only has to keep it. A delay of Red's Turn 3 Units until Turn 4, and Turn 6 until Turn 8 [when they arrive next to the hill - a critical moment and location] will give Blue more time to invest the hill. As my overall experience is that the game is Red's to lose, this delay in Red reinforcements is worth trying for any fans of this scenario.


As a solo player, I recommend playing Blue as the reinforcements are decided at setup [the three you didn't deploy] and would present no surprise if you play Red. Red's schedule can be randomized by Unit or put down on two cards which are randomly drawn.

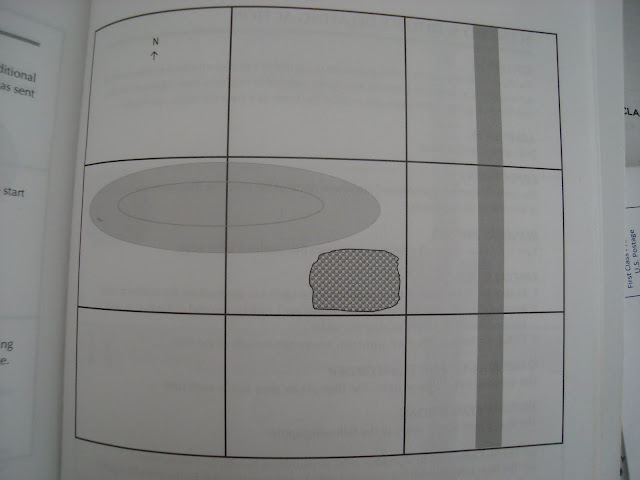
If you want more uncertainty, write all six red units down on separate flash cards, deploying two random hidden selections upon the hill, and two on the North Rd. and the last two as the West Reinforcements. Do not reveal them until you are in spotting distance - 12" in the original OHW rules, or they fire or move. You can then dice for the two main ploys I think are useful at the hill, whether or not to occupy the wood, whether or not to hide in the defilade of the hill from Blue firepower. Again, the last depends on how you define the hill - does it have a military crest? Or is it a plateau all around the edge. NT seems to imply a military crest with his diagram of oval 2-level hills, IMHO. So if taking 50% hits, Red might dice to pull that Unit back behind the crest.

The above issues will be largely the same for the American Civil War and WWI rules. Each will present Cavalry options, faster but with less firepower, and Artillery which is a bit weaker than Mortars but presents the same possibilities. The WWI Artillery are d6, so should inflict 6-7 Hits a turn on average if you get two of them; with an Infantry attack, at least one Red defender should be crippled or destroyed by Turn 3.

Conclusion
I hope that this analysis of Scenario #8 gives you some inspiration to play this and many other One-Hour Wargame scenarios multiple times with changes in force and some experiments with your terrain and miniatures collection. Many of the scenarios are quite simple to work with but have a lot of depth and provide numerous quick games each providing another lesson that increases understanding of tactics both within and across various periods of military history. Have fun and sharpen your brain!

Saturday, December 28, 2019

OHW Symposium: Scenario #8 Analysis, p.1

Scenario 8 is a classic: it has few moving parts but they keep the puzzle puzzling. It also shows its inherent design strength by consistently presenting a similar challenge through various periods - as long as your rule mods don't break it by eliminating one of the key aspects of the game: force composition and terrain mechanics.

...such a simple table! How are we to know there's hours and hours of study here?

The military challenge has North Red defender holding a hill that interdicts a road that attacker Blue is advancing upon from the South. Blue detours to seize the hill while Red forces rush to reinforce from the North and West. We may imagine that Red has a series of units spread at key points in the campaign area to defend itself from the Blue invasion. Some details:
  • Both sides have 6 Units.
  • Red may select 2 Units to setup on the hill facing South. Two groups of two Units arrive on turns 3 and 6, the first at the road, the second from the West side, just North of the hill itself.
  • Blue has two groups of 3 Units arriving turn 1 and 4, via the road.
  • Red has first player Turn.
Winner must be in exclusive control of the hill. As it is relatively easy to contest the hill, one must destroy enough enemy Units that they cannot contest it at game end. 

It should also be noted that one can introduce a tie-breaking mechanic:
- the side with the most Units on the hill, or the fewest Units destroyed, wins a marginal victory
- dice against Unit losses until one side retreats on Turn 15 [so if Blue has lost 3 Units, and Red 4 Units, Red would roll trying to beat a 4 - if passed, Blue must roll trying to beat a 3 - continue until one side fails and decides to retreat to lick their wounds].
Doing this usually makes the skillful player the winner.

Key to the entire position, IMHO, is the small wood and the hill area behind it [so the East end 6"], which secure the flank of Units on the hill. The hill is very strong to the South, as both defending Units will be able to fire from it [if not shooting Units, give an uphill defense from a charge into melee, taking half casualties so lasting twice as long as normal]. However the hill is weak on its East side, where only one unit can face East and the attacker can mass the power of 2-3 Units. As the attacker only has a slight advantage of 3-2 Units with which to attack, a choice must be made to attack from the South or the East.

Complicating the selection of a Blue axis of attack and how to develop it are the period rules and the force composition. For 6 of the 9 early OHW period rules, entry into Woods is limited to Skirmish Units that 1/3 of the time Red or Blue will not have [if using the diced force composition mechanic on p.64]. For the remaining 3 Late period rules [ACW, WWI and WWII] the importance of the woods is greatly reduced as all Infantry may enter it, and Infantry are 1/2 - 2/3 of the force.

Below, I give some situations regarding force composition issues. As my Feudal Welsh borderlands collection crosses over the Ancients, Dark Ages and the Medieval Unit selection a bit, it may not be strictly accurate for all the force composition lists, unfortunately. It does show the ease with which one can adapt the general period lists to more specific historical events, forces, Unit types and locations, however.

Problem #1: Red has no Units that can occupy the wood and Blue does
Red is in serious trouble as the wood will be used as a base for the Blue attack. Below, Red occupies strong position with two infantry - taking half casualties in melee in the early sets of rules, but neither can occupy the woods. Turn 1, Blue advances with mixed force of one Cavalry [Welsh javelin throwing Teulu], one Skirmisher, and one Archer Unit.
Turn 2 below, Cavalry threatens to engage, Skirmisher occupies wood, Archers flank hill. Red's possibilities aren't great - move off the hill against faster foes? Await reinforcements?

Situation improved: Red has an Archer to oppose the Blue force, but which Unit to target? The menacing Teulu, the harassing Skirmishers, or the opposing Archers??

Situation even worse: Red has no shooting, while Blue is maxed out with two Archers and a Skirmisher. OHW rule hills do not have an advantage against shooting, only melee. In this case, Red will lose at least one Unit to massed archery, and hope to hang on until Reinforcements enter next Turn - and they'll need to be Knights/Cavalry and Archers.

Problem #2: Red has a Unit to occupy the wood and Blue does not
The mechanic for Line of Sight INTO woods is now crucial - and NT doesn't specifically state one in the OHW.  However it can be assumed from the rule explanations and scenario commentary that it is "you can see into the entire wood, but not thru two sides of it, i.e. through the entire wood." 

Some other typical mechanics to handle line of sight in woods:
- you can see a limited distance into the woods, e.g. short range shooting distance.
- you can only see a unit lining the edge of the woods.
Obviously, the type of wood and the ability of Units to fighting into and within it depends on the location / history and the scale of the game - the smaller the scale, the easier it should be to see into the woods.

Below, Red Player Turn 1, he starts with an Infantry and a Skirmisher on the hill...
...and occupies the wood with the Skirmisher.
Blue Player Turn 1, half his force enters: Knight, Archer and Infantry:
Red occupies a central, forward position in the wood and none of the Blue Units may enter it, ergo cannot melee the Skirmish Unit. The Skirmisher may emerge to use its limited fighting power against the Blue Infantry or Archers, but it is not wise - as long as they stay in the wood, the Skirmisher has protection from shooting and being charged. In effect, the wood is a small fortress just for the one Unit.

Blue Player Turn 2, he splits his forces - Archers stand and shoot Red Skirmisher, Knights go left to threaten Red Infantry, Infantry go forward on road to act as a blocking force or to get onto the East side of the hill. It looks like a grim situation for Red at this point.
Red Player Turn 3, two Units enter, a Cavalry and an Archer.
Blue Player Turn 3, the Knights threaten the West hill flank, the Infantry back up from the combination threat of Archers and Mounted, while the Blue Archers continue to attack the Skirmishers from outside their range. Red now occupies a strong central position while Blue is scattered, with the knights being especially vulnerable.

Red Player Turn 4, he exploits his central position, advancing with Archers and Cavalry to stall the Blue attack. While the Skirmishers have little to do except lurk in the woods and toss a few javelins at the Blue Infantry, their presence has been significant.

Alternative to Problem #2: 
As above, but Blue has an effective force entering: 2 Archers and a Knight!
The presence of Blue massed Archers forces the Red Skirmishers out of the woods or they will be destroyed in about 3 turns - 2 if Blue rolls well!
Blue still has to spread out a bit to work the 12" Range for Archers, but they will continue to threaten both Units on the hill - when one is weakened, the Knights can charge it.
Again, Red will be relying on the arrival of reinforcements to hold out. Their arrival immediately pressures Blue on the road, while the Cavalry can help hold the hill.

The above solutions apply to all the earliest rules: Ancients, Dark Ages, Medievals and Pike and Shot. In the following Horse & Musket / Musket & Saber rules, If Red has a Skirmish Unit, it must start the game on the hill above the wood while the other Unit should be an Infantry, possibly an artillery if it is powerful enough [shooting d6 at least]. 

If Blue has no skirmishers and Red does, then the first thing Blue must do is advance against the wood at an angle shielded from the firepower of Red's other Unit. Blue then destroys the Red Skirmisher occupying the wood - or forces Red to retreat it - and moves against the remaining Unit on the hill. The speed with which this happens and Red's selection of the first pair of reinforcements will determine how much this will help Blue. If a Red Cavalry and Artillery enter, then they will quickly make their influence felt.

Conclusions on Scenario #8 and the Early Period Rules
In my experience, attacking from the South only works if the 3-2 Blue advantage in numbers brings a significant position or firepower advantage. This means Blue can exploit the woods and Red cannot [a position advantage] or Blue can bring sufficient firepower to bear that at least one Red Unit is destroyed. An example would be two Archers to none, or 3 v. 2 Infantry / Reiters in Pike and Shot [and...keep your powder dry!].

So in the Ancient, Dark Ages, Medieval and Pike & Shot periods both sides will have to start the game with their best shooting Units and / or a Skirmisher, if available [and they aren't always both officially available in a period, e.g. Medieval, and if they are available they are limited in quantity to 0-2 typically]. 


In the Horse and Musket period, both sides will have 3-4 Infantry with good firepower so the presence of a Skirmisher is less impactful, and only if one side has it and the other doesn't. if Red has one then Blue will be forced to reduce or screen the wood. Its weaker firepower will be offset by the cover advantage, taking only half Hits. This will leave two Blue Infantry to gang up on a lone Red Infantry on the hill, but it will take time and Red reinforcements are arriving soon. 


Alternately, Blue can attack the hill straight on with three Infantry Units, accepting some casualties from a Red Skirmisher in the woods while blasting the other off the hill. This may work before Red reinforcements arrive at the hill since none of these rules give shooting cover to Units on the hill, but they DO give a significant melee advantage of halved casualties. It will certainly help Blue to possess the only skirmisher, as he will use the wood as a little fortress to assist the attack of the two Blue Infantry which will be attempting to handle two Red Infantry already on the hill.


In all the above, one can make an error, or roll poorly, which will affect the outcome. So, don't do that!  :)


Hope this has been a helpful presentation, but that's not all of it - tune back in for Part 2 - the later periods" ACW, WWI and WWII.

Wednesday, December 18, 2019

Figure Painting Challenge: Dec 15 - Mar 15 2020

Painting barefoot - OK...weird, but ok.
But you must paint the figures yourself!
Image of Tom Sawyer and friends whitewashing a fence. Reduce Stress
https://withoutstress.com/do-what-you-love-to-reduce-stress/

To provide painting motivation, l will be sponsoring a painting contest over winter, ending March 15th, hence it is THE:


"BEWARE THE IDES OF MARCH" 
FIGURE PAINTING CHALLENGE


The suggested scoring comes from what appears to be a Canadian Hobby Store here [CLICK]. I guess one might wonder if the points are Imperial, Metric, or US Standard, but we'll have to sort that out later - HAHA. Most importantly, this guy's challenge is in its 10th year, so I'm assuming he knows something!

The Scoring

Below is the Challenge scoring, number=point[s]: 

6mm foot figure = 0.5
6mm mtd fig, artillery gun, crew-served gun = 1
6mm vehicle, limber, etc. = 2

10mm foot figure = 1
10mm mtd fig, artillery gun, crew-served gun = 2
10mm vehicle, limber, etc. = 3

15mm foot figure = 2
15mm mtd fig, artillery gun, crew-served gun = 4
15mm vehicle, limber, etc. = 8

20mm foot figure = 4
20mm mtd fig, artillery gun, crew-served gun = 8
20mm vehicle, limber, etc. = 15

28mm foot figure = 5
28mm mtd fig, artillery gun, crew-served gun = 10
28mm vehicle, limber, etc. = 20

40mm foot figure = 7
40mm mtd fig, artillery gun, crew-served gun = 15

40mm vehicle, limber, etc. = 25

54mm foot figure = 10
54mm mtd fig, artillery gun, crew-served gun = 20
54mm vehicle, limber, etc. = 30

Other scales, miscellaneous models/figures/monsters will be scored on a submission-by-submission basis but basically add up the dimensions of the figures main body [not including long lances, tentacles or antennae, for example] for a rough estimate. 

BASING: a bonus of 20% will be given for based and flocked figs. If you base a figs you've already painted OR re-base them [an odious task], you get the 20% of their painted value - after all, you're completing them for the table!

Quality: while we aren't stickler's for artistry [as these are for wargaming] I will grant bonuses for excellent work, e.g. on a level of Gary A and some others who's stuff is just great. I've no problem with encouraging us to become better! Rule of thumb...20% of figure value, just like Basing.

Terrain Submissions

It's not perfect...but...we'll keep to our 6" cube format: if your terrain piece (or collected terrain pieces) fills a 6" cube, you get 20 points. If your terrain would 'fill' multiple 6" cubes, then multiply 20 points for each cube of volume.

How to get started:
  1. post reply here stating who you are and your painting goal - 300 pts is suggested if you're uncertain.
  2. decide if you want to compete for Honor or Prizes
  3. if prizes, a $10 buy in is required - half of all proceeds go to prizes, the other half go to Pooch Kaboose dog rescue in Jenkintown. Prizes will be gift cards for hobby items, or Old German Lager, "the world knows no finer" beer! the $10 entry fee must be sent to my paypal ID, which is my gmail: brasidas19004 at etc. 
  4. I will not compete for prizes since I'm running it, but I will match the amount we donate to the Rescue!
  5. prizes awarded will be 1st place and Pitiful second to last. More "places" i.e. 2nd, 3rd will be given if we raise the money to at least double the entry fee.
  6. CHALLENGES. You may challenge a friend or anyone to paint a certain amount in a certain time, e.g. 100 points over your 2-week college break, whatever. You get Honors for this, not prizes, however.
  7. competition starts Dec 15 and runs thru Mar 15, 2020. 
  8. you get half credit for half-painted figures / models started before Dec 15th, even if you started them 20 years ago - the goal is to encourage us to finish projects! 
Any questions, please email me, I can always edit this post.

Caveats: 
  • you must be local to compete for prizes so we can see and verify your work when we play you!
  • you may not paint figs for a living!
  • you must paint these yourself!
Tracking:
Goals will be tracked in summary form, with pictures [if submitted] on a weekly basis, in future posts that will include the Painting Challenge 2020 label. Pics of completed figs/units/vics/monsters preferred, but substantial progress on an amazing vic/monster/ship sculpt will be inspiring, too!


COMPETITORS

Alex A's goals: 500 pts of 15mm WWII, Franco-Prussian War, 1/3000 ships, 54mm NW Frontier and WWII, Modern Micro Armor and 40mm ECW.


Steve W's goals:

- knock out a US sherman tank company.  2 platoons and HQ element, heavy weapons, AT guns, and 105mm artillery crews.
- 10mm Napoleonic madness!
- Stretch goals of 15mm WWII:
       *German Fallschirmjaegers
       *8th Army British Desert Rats
       *1944 NW Europe British.  

Brian H of By Brush and Sword fame - Goals:
http://bybrushandsword.blogspot.com/
"Count me in. 300 points, Honor, looking to do 15mm AWI, 15mm ACW, and 28mm Fantasy."


Bob McN Goals: I have 6 previously started SM Reivers at 2.5 points each, 14 Shoretroopers plus hopefully soon to be released (yes, another) Darth Vader and Iden Versio at 5 each, a Dewback Rider and four Runewars monsters at 10 each, and a Chaos Knight I'm converting that's like a foot tall so I'm counting it as 30 [Might be more like 100 pts!].
So that's 175 points.

Friday, December 13, 2019

One-Hour Wargames; Terrain List

There are 30 Tabletop Tests in here - can you pass them?

Don't trip on this small package - most gamers fall flat on their face.

Neil Thomas begins this section of OHW with an astute observation: that most gamers pay loads of attention to rules, and then little attention to the type of scenario they play. This leads to the constant use of the contrived "Pitch Battle" type of encounter, which is both implausible and becomes sterile over time, anyway. He concludes, "The key to any rewarding wargame is therefore an imaginative scenario." 

NT then provides 30 scenarios of which I've played over half and had to tweak nearly nothing. Still, with a couple of modifications like random setup or entry of reinforcements, the possibilities of the 30 can be easily doubled to 60, which is then doubled to 120 since you should really play both sides. One could also reverse the terrain types, so for example if playing in 'Nam or Guadalcanal, you could make all clear area jungle, and the woods clearings.

A challenging bit of statement here - and quite convicting.

This is why his rules can be so simple - the games aren't about the rule mechanics, they're about achieving the victory conditions 60 different ways. And with 9 sets of rules, you are already looking at 540 unique playing situations, throw in the variable force matrix of 6 forces per side [36 different combinations] and you are suddenly at almost 20,000 different possibilities for games to play, in around an hour.

Unlikely any of us will live that long!

It's not all as simple as the below, of course.


In any event, you will find your setup time to go more quickly if you prepare all the terrain in advance - much of it repeats from scenario to scenario, so there isn't as much to do as you would think. A couple of suggestions:
- Sticking to one terra firma will make life easier. The most obvious is N. America / Europe green landscape. Next up would be a more arid, desert Mediterranean ground. 
- Sticking to one scale will also be easier. If you must pick one, I strongly suggest 15mm, followed by 10mm for these rules, since they are designed to be played in a small amount of time, space and resources. 20mm or 1/72 also works fine. 
- the scale issue also translates into a vertical issue for terrain heights, and shapes. A hill that is a gently rising from the desert and is a few hundred yards long is very different from a hill that rises 50-100 feet in the foothills of the Vosges!

Below: 15mm desert dune - pretty easy to make, well fought over, and gets a lot of complements...would work for 10mm and 1/285 also, but 20mm and up it's just too small.


So without further ado, I offer up the terrain list for these scenarios - build all this, and you will be knocking out your terrain needs for 100 years of One-Hour Wargames!

Roads & Rivers: 3” width – could model narrower with cleared berms and banks. [EDIT: I had the hills wrong, apologies!]
  • 6 HILLS all 2-level: 6x12” x 2, 18x12”, 18x6", 12x12” [“rough”], 24x6".
  • 6 WOODS: 6x6” wood x3, 6x12” woodx2, 12x12” wood.
  • 2 x 6x6” towns, 8x8´town, 6’ of road, 2x Bridges, 2xFords
  • 3’ of river, 6x6” Swamp, 6x12” Swamp, 12x12” Swamp
Obviously, some terrain pieces could be built up from two-three others, like making a 12x12” wood from 2 6x6” woods and one 12x6” wood, for example. There are a couple of scenarios with a 24”x 6” Hill but the 18” long one will do just as well, or you can put together the two 6x12” Hills, you’ll just have a saddle in the center. There’s also a giant woods in one scenario, 1’x3’, but probably best done by marking the line of the table with string/yarn, and distributing the 4 Woods into the space.

Monday, October 14, 2019

Happy Columbus Day, 2019!?

...for those of us who are of European descent - yes!

Let's get the heck off this continent - there's over 700 wars coming!    [image is from CLICK as "whatever happened to those ships, anyway?"]

Altho one intellectual writer wants us to consider Columbus Day a good reminder of the triumph of Western philosophical Reason and Individualism [CLICK],

...and of course loads of self-loathing liberal ideologues want to emphasize the bad net results of the European age of discovery, especially in the Americas, for Indians [no CLICK...it's just too easy to find everywhere today],

...here, at a wargaming blog, I think it is most obvious to consider today as:

 "Get the Heck out of Europe Day".

As a place with many notorious plagues that devastate up to 60% of the population [CLICK] and wars, upon wars, upon wars, Europe is well worth escaping:


Pre-500 Before Christ [BC]
·         c. 5000 BC Talheim Death Pit
·         c. 1104–900 BC Dorian invasion
·         c. 753–351 BC Roman–Etruscan Wars
·         c. 753–494 BC Roman–Sabine wars
·         743–724 BC First Messenian War
·         710–650 BC Lelantine War
·         circa 700–601 BC Alban war with Rome
·         685–668 BC Second Messenian War
·         669–668 BC Sparta–Argos War
·         600–265 BC Greek–Punic Wars
·         595–585 BC First Sacred War
·         560 BC Second Arcadian War
·         540 BC Battle of Alalia
·         538–522 BC Polycrates wars

500–200 Before Christ
·         509–396 BC Early Italian campaigns
·         500–499 BC Persian invasion of Naxos
·         492–490 BC First Persian invasion of Greece
·         482–479 BC Second Persian invasion of Greece
·         480–307 BC Sicilian Wars
·         460–445 BC First Peloponnesian War
·         449–448 BC Second Sacred War
·         440–439 BC Samian War
·         431–404 BC Second Peloponnesian War
·         395–387 BC Corinthian War
·         390–387 BC Celtic invasion of Italia
·         335 BC Alexander's Balkan campaign
·         323–322 BC Lamian War
·         280–275 BC Pyrrhic War
·         267–261 BC Chremonidean War
·         264–241 BC First Punic War
·         229–228 BC First Illyrian War
·         220–219 BC Second Illyrian War
·         218–201 BC Second Punic War
·         214–205 BC First Macedonian War

200 Before Christ and on
·         200–197 BC Second Macedonian War
·         191–189 BC Aetolian War
·         171–168 BC Third Macedonian War
·         135–132 BC First Servile War
·         113–101 BC Cimbrian War
·         113 BC – CE 439 Germanic Wars
·         104–100 BC Second Servile War
·         91–88 BC Social War
·         88–87 BC Sulla's first civil war
·         85 BC Colchis uprising against Pontus
·         83–72 BC Sertorian War
·         82–81 BC Sulla's second civil war
·         78 BC Marcus Aemilius Lepidus
·         73–71 BC Third Servile War
·         73–63 BC Roman Expansion in Syria & Judea
·         65–63 BC Pompey's campaign in Iberia and Albania
·         63–62 BC Second Catilinarian conspiracy
·         55–54 BC Caesar's invasions of Britain
·         58–51 BC Gallic Wars
·         49–45 BC Caesar's Civil War
·         44–36 BC Sicilian revolt
·         43 BC Battle of Mutina
·         43–42 BC Liberators' civil war
·         41–40 BC Perusine War
·         32–30 BC Final War of the Roman Republic

Anno Domine, Latin for "Year of Our Lord"

Note that such is human nature that the coming of Christ has not lessened our use of organized, large-scale violence to express disagreement amongst ourselves.
·         5–41 Iberian-Parthian war
·         49–96 Roman conquest of Britain
·         51 Armenian–Iberian war
·         69 Year of the Four Emperors
·         69–70 Revolt of the Batavi
·         193 Year of the Five Emperors
·         208–210 Roman invasion of Caledoni
·         238 Year of the Six Emperors
·         271–278 ColchisRoman War
·         284–285 Roman civil war
·         306–324 Civil wars of the Tetrarchy
·         350–351 Roman civil war
·         360–361 Roman civil war
·         367–368 Great Conspiracy
·         376–382 Gothic War
·         387–388 Roman civil war
·         394 Roman civil war of 394 AD
·         482–484 Iberian-Persian War
·         526–532 Iberian War
·         535–554 Gothic War
·         541–562 Lazic War
·         582–602 Maurice's Balkan campaigns
·         c. 600–793 Frisian–Frankish wars
·         650–799 Arab–Khazar wars
·         680–1355 Byzantine–Bulgarian wars
·         711–718 Umayyad conquest of Hispania
·         715–718 Frankish Civil War (715–718)
·         722–1492 Reconquista
·         735–737 Georgian-Umayyad Caliphate War
·         772–804 Saxon Wars
·         c. 800/862–973 Hungarian invasions of Europe
·         830s Paphlagonian expedition of the Rus'
·         839–1330 Bulgarian–Serbian Wars
·         854–1000 Croatian–Bulgarian wars
·         860 Rus'–Byzantine War
·         865–878 Invasion of the Great Heathen Army
·         907 Rus'–Byzantine War
·         914 Arab-Georgian War
·         939 Battle of Andernach
·         941 Rus'–Byzantine War
·         955 Battle of Recknitz
·         970–971 Sviatoslav's invasion of Bulgaria
·         982 Battle of Stilo
·         983 Great Slav Rising
·         1002–1018 German–Polish War
·         1014–1208 Byzantine–Georgian wars
·         1015–1016 Pisan–Genoese expeditions to Sardinia
·         1015–1016 Cnut's invasion of England
·         1018 Battle of Vlaardingen
·         1024 Battle of Listven
·         1024 Rus'–Byzantine War
·         1043 Rus'–Byzantine War
·         1044 Battle of Ménfő
·         1048–1064 Invasion of Denmark
·         1050–1185 Byzantine–Norman wars
·         1057 Battle of Petroe
·         1060 Battle of the Theben Pass
·         1065–1067 War of the Three Sanchos
·         1066 Norwegian invasion of England
·         1066–1088 Norman conquest of England
·         1067–1194 Norman invasion of Wales
·         1067 Battle on the Nemiga River
·         1068 Battle of the Alta River
·         1073–1075 Saxon Rebellion
·         1075 Revolt of the Earls
·         1077–1088 Great Saxon Revolt
·         1078 Battle of Kalavrye
·         1088 Rebellion of 1088
·         1093 Battle of Schmilau
·         1093 Battle of the Stugna River
·         1097 Battle of Gvozd Mountain
·         1099–1204 Georgian–Seljuk wars
·         1109 Battle of Głogów
·         1115 Battle of Welfesholz
·         1121 Battle of Didgori
·         1126 Battle of Chlumec
·         1130–1240 Civil war era in Norway
·         1135–54 The Anarchy
·         1142–1445 Swedish–Novgorodian Wars
·         1144–1162 Baussenque Wars
·         1159–1345 Wars of the Guelphs and Ghibellines
·         1164 Battle of Verchen
·         1169–1175 Norman invasion of Ireland
·         1173–1174 Revolt of 1173–74
·         1185–1204 Uprising of Asen and Peter
·         1198 Battle of Gisors
·         1198–1290 Livonian Crusade

·         1201 Battle of Stellau
·         1202 Siege of Zadar
·         1202–1214 Anglo–French War
·         1205 Battle of Zawichost
·         1208–1227 Conquest of Estonia
·         1209–1229 Albigensian Crusade
·         1211 Welsh uprising of 1211
·         1215–1217 First Barons' War
·         1216–1222 War of Succession of Champagne
·         1220–1264 Age of the Sturlungs
·         1223–1241 Mongol invasion of Europe
·         1223–1480 Tatar raids in Russia
·         1224 Siege of La Rochelle
·         1227 Battle of Bornhöved
·         1231–1233 Friso-Drentic War
·         1234–1238 Georgian-Mongol War
·         1239–1245 Teltow War
·         1242 Saintonge War
·         1256–1258 War of the Euboeote Succession
·         1256–1381 Venetian–Genoese Wars
·         1256–1422 Friso-Hollandic Wars
·         1260 Battle of Kressenbrunn
·         1262–1266 Scottish–Norwegian War
·         1264–1267 Second Barons' War
·         1265 Battle of Isaszeg
·         1275–1276 The war against Valdemar Birgersson
·         1276–1278 6000-mark war
·         1276 War of Navarra
·         1277–1280 Uprising of Ivaylo
·         1278 Battle on the Marchfeld
·         1282–1302 War of the Sicilian Vespers
·         1283–1289 War of the Limburg Succession
·         1284–1285 Aragonese Crusade
·         1288–1295 War of the Outlaws
·         1296–1357 Wars of Scottish Independence
·         1297–1305 Franco-Flemish War
·         1298 Battle of Göllheim

And for those who were lucky enough to escape Europe right away, they missed out on all these wars [altho, granted, they had a tough time with the ferocious and disinclined to share  Indians of the Americas…]

·         1493 Battle of Krbava Field
·         1493–1593 Hundred Years' Croatian–Ottoman War
·         1494–1498 Italian War of 1494–98
·         1495–1497 Russo-Swedish War
·         1497 Cornish Rebellion of 1497
·         1497 Battle of Rotebro
·         1499 Swabian War
·         1499–1504 Italian War of 1499–1504 – 20,000 killed in action[1]
 [have to give wikipedia credit for the list, altho they can't figure out how to date things properly, so oh well, no click for you wiki!]

Note that there are over 700 conflicts. The big winners for "man's inhumanity towards man" in terms of numbers would have to be WWI thru WWII, with an estimated 100 million people killed [give or take several million]. A breakdown by nations is given HERE, but unsurprisingly, The Soviet Union and China are in the lead with around 20 million each.

Today, Europe has been tamed by its horrific past and seems a pretty benevolent realm of Socialist sloths who have great museums and ruins. Still, it is worth remembering that many of the ruins were not merely ravaged by Emit Flesti and Satan's obvious handymen - and handywomen - but due to the evil that lurks in us all. 

As a wargame blog, this site doesn't promote war as an ideal or even a GOOD solution to human problems. It is unfortunately a necessary solution that should be used as a last resort, and not just because it is perceived as faster and easier than other more peaceful solutions [which is usually incorrect, anyway].

As for the Indians, well, it is trendy to focus on the losers of history these days; BUT it is worth considering that if they had had any chance to conquer Eruope and Asia, we would all be living on reservations, oppressed by Iroquois [etc], and worshiping the Great Spirit who put this world on the back of a Turtle. 

And may the Lord have mercy on us all.