
First a quick comparison of the forces involved:
UNITS
Patriots have 7 more 2-step units. However, in terms of Combat Factors, it is more like 6. The 1-point less for their units is pretty important, since in a straight-up fight, it drops them down a combat diffential [or odds] table, from 0/+1 to -2/-1, which is not nearly as good. So one thing we already know, the Rebels will have to work to stretch the flanks as much as possible and preserve forces while the British will seek to destroy as many units as possible to even the odds.
This is somewhat leveled by the British battalions, of which there are six. One is classed as Lights [the jagers - why not the left and right units, I don't know, as I think they were mostly light infantry battalions], the other four are in effect 1/2 strength brigades with high morale, including three '6' morale units from the Grenadiers. The great advantage of these is that they can stack with and add to the combat factor '8' of the brigades. So now you have British stacks with a CF of 11 for starters.
Each side also has one unique unit, an artillery for the Rebels and a Cavalry for the Loyalists. Each brings in a soft intro to those parts of the rules that are more important in the ACW and Napoleonic games.

For leaders, the colonists have 4 and the Kings Men have three [one Hessian]. Overall, the colonists are much more dependent on theirs due to 1) lower morale, 2) the low ammo rule [which is a morale check] and 3) lower CF on their 2-step units. That being said, I've managed to kill all the British leaders in one playtest, and half the Americans in another!

The reverse of all the leaders is identical - all zeros, like Mr. Sullivan above.
So, let's put these on the table, shall we?
Once again, the sneaky rebels are creepy up on those galant red-clad lads. The left and right wing Lights are occupying Mt. Airy and Lucan's Mill, as colonial columns enter. To the center-left, down Germantown Rd. are Sullivan's PA & MD column, followed next turn by Lord Stirling's column of NJ and NC troops.
From the center-right is Greens's Virginians with a CT regiment followed by Gen Washington Himself with Knox's light artillery, coming down Limekiln Rd. [which is a mile West of my house, incidentally]. On the left and right are two wings of two units each of militia, entering down Ridge Rd. and Old York Rd. The one choice for the Patriot player is where to put Gen Washington and the guns. They actually can enter with the militia columns, also, but those units are two weak to provide a stable formation for them.

The fog rules...a bit convoluted in that there is random d3 movement for Units, d3+3 for leaders. However, key terrain also costs more - roads are 1mp not 1/2mp. Unclear is if a leader can still give a unit his movement bonus. Interestingly, after doing lots of math and consulting the rules, it all pretty much cancels out, and the main difference is Patriots attacking lights turn 1 or turn 2. The faster they attack, the easier it is for Washington's army.

Above, Sullivan manages to reach and attack the left wing,Light infantry pickets [I allowed him to use his move bonus of '2'] and attacks from the fog. It is a 10 v. 3+2+2 v. the Lights [2 each for the building and the hill], so table +2/+3 [about a 3-2 attack]. They roll a '6' and the result is Dm(Dr) so the lights must check morale - a '5' - and if they fail they Rout, and if they pass they Retreat. The Rout means retreat 3 hexes disrupted, the Retreat is to hold ground disrupted OR retreat 1-3 hexes. The lights easily pass, so I retreat them a hex and Sullivan advanced onto the Mt. Airy plateau.
Below, Greene and Washington advance with the Virginians. They also manage a Turn 1 attack [again, using Greene's '3' Leader move bonus for a 4-hex total move], but they roll a '4' for a Dr result - the lights retreat a hex, and Greene rolls to get killed [anytime you roll a '4' on the CRT, you check for all leader's in the combat OR stacked with fighting units...it's unclear...and on a 5-6 they are killed and removed from the game.

Below, end of Turn 1. I have been choosing to keep the lights involved, retreating slowly, which should work with the fog slowing the Rebel advance. Meanwhile, the British advance one hex each [T1 special rule] and head into Germantown where they must defend the Market Square. The jager's to the left inflict a step loss and Disrupt a militia unit.

Below, working on Turn 2 - I entered the militia to right incorrectly, so I re-rolled for them.

Below, Turn 2, Sullivan dies! He attacks with his Pennsylvanians, and gallantly falls at the head of his men in the fog and confusion. Rolled a '4' for combat results and then a 5 for the Leader casualty check. The Lights pass their morale and retreat further into Mt. Airy. This is a pretty big problem as leaders are critical for the weak-morale Patriot units, and their combat factors are essential against the British brigades who are one stronger in CF to begin with [8 to 7] which drops you off the 0/+1 table to the -2/-1 table.

On the right flank lights, the Patriots inflict a Rout result [they rolled a '6' for morale - auto failure] and the right flank lights flee into Germantown to occupy the Chew House.
Turn 2 end. Militia stalk the flanks, while the main effort coordinates an advance against Germantown proper. The British have a solid line set up just behind the Chew house which acts as a funnel, channeling Rebel Units. Kelly's hill is often tempting to the British player, but STAY OFF IT! It's a trap that is not worth the +2 for defense. The Hessians have been pushed left to Rittenhouse Town to keep the militia out of the camp. The Queen's Ranger Cavalry arrive to protect the British right flank.

Below, Turn 3-4-ish. Full battle is joined. The British dilemna is obvious - too many Rebel units, too wide a front! It's hard to protect the Market Square when the flanks are constantly being enveloped. Below, Potter's militia and a PA regt have routed the 1st Brigade, while the lights have retreated out of the Chew House which was subsequently re-taken by Lord Howe with the left wing Light battalion. I took Kelly's Hill - will probably regret later...

Turn 5, Washington Rallies a battered PA regiment in Mt. Airy. The Chew house plateau is firmly in Patriot hands. Lord Stirling hangs back to rally Units as needed [trying to minimize risk to my surviving generals after the demise of Sullivan.

Turn 5, more apparent British problems. The combat results have them getting scattered in a north-south line. While Market square is firmly in hand, their advances and retreats have left them quite vulnerable. How is rallying force south of town [Units recover step losses with a morale check - much easier for the British whose base morale is a '5'], while Grant and Knyphausen hold the line. Militia still threaten both flanks from woods.
Also, the fog has lifted so everyone is much faster and more maneuverable.

Turn 5 - British start turn by challenging three key Rebel units with "low ammo" rolls - Rebels must pass morale or become disrupted while they re-supply themselves. Amazingly, all three units pass! This is a critical moment, as now a massive counter-attack can proceed.

Woods are something like bastions to militia - they do not have to roll morale [a '2'!] to enter enemy ZoC if they are in woods. This is a huge help to them. Below, the militia need to hold up the re-enforcing grenadier battalions, so roll and get a '1' and pass!

They will now go toe-to-toe with the Grenadiers [idiots...] just east of the camp. Additionally, the left flank militia manage to close in on the jagers, also! The Patriots close in all around the strung-out British. This could be a big moment for them.
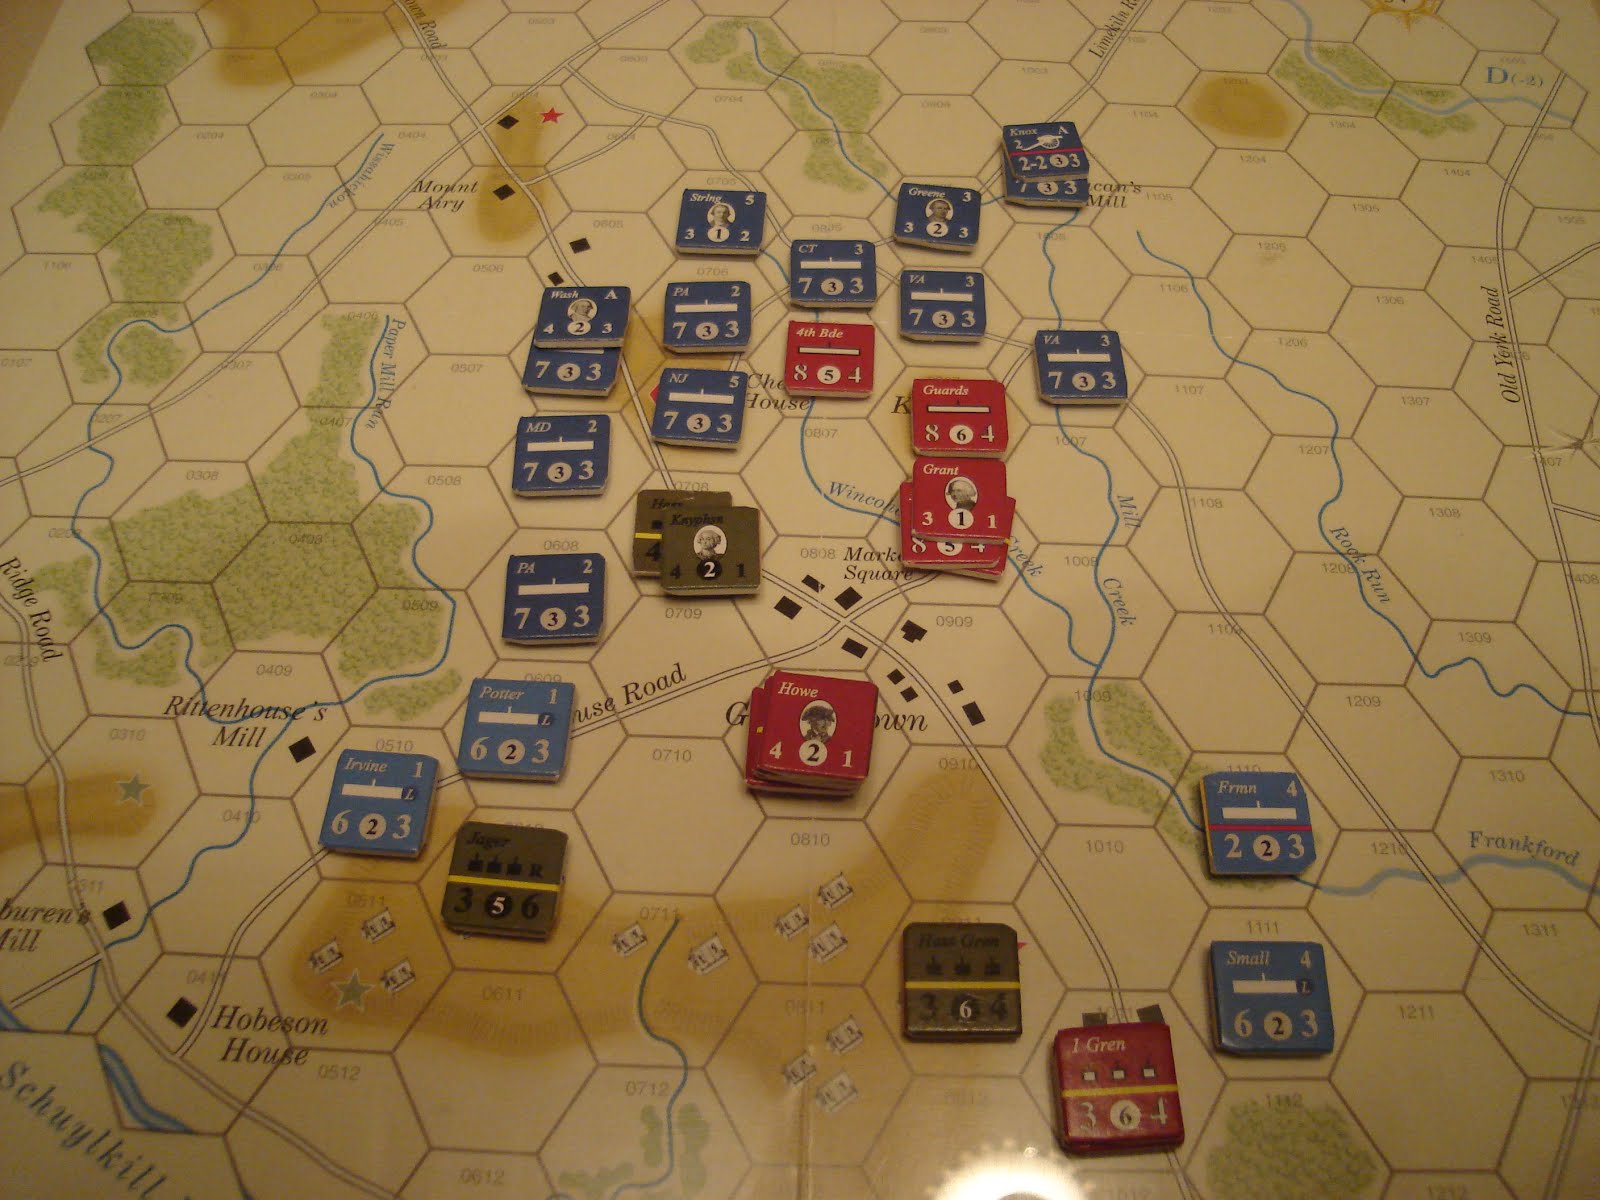
The Hessians take a step loss and retreat to Market Square. Howe works to rally a large stack of British Brigades that retreated from Kelly's hill and surrounds. Only Grant holds firm with the Guards and some lights that he has rallied from Disruption. The Militia attack on the Grenadiers results in a retreat back to the woods, unsurprisingly. Irving's militia occupy the British camp! The British must hurl them out or face a defeat [according to this game].

Bottom of Turn 5, British. A British counter-attack has reformed a line on Germantown, but farther back so that the camp might be better defended. Despite this, Irving's Militia is in the camp. Time to call in...the Queen's Ranger Cavalry! This is a great time to try out the Cavalry rules, which are pretty extensive and a bit complex. First, the QR charge Irving.

Next, they roll and pass morale with a '2' [needing a '4']. Surprisingly, the militia also pass needing a '2' and rolling a '2'! Despite this gallant effort, the QR roll a '6' and the militia check morale and fail on a '5', routing behind Potter's militia and losing a step. The QR re-occupy the camp, saving countless loot and trinkets from colonial capture. Huzzah!

The QR are allowed to attack INFINITE times as long as they are successful, but their second charge against Potter results in less spectacular results [don't roll a '1'], and altho the QR take ground they are also disrupted and their foray into glory ends.

The QR advance to the rear post-haste [i.e. Rout] and settle down on the other side of the camp by the Germantown road. Still, a bit of drama! I don't think they did much historically, and certainly the limited light dragoon resources available to both sides was not hazarded much in battle in the North - they did a lot more in the South, interestingly.
Meanwhile, the 2nd Brigade counter-attacks with Lord Howe to their right. They push the Pennsylvanians back towards Rittenhouse town, and Lord Howe does the same to the Marylanders, hurling the papists back towards Mt. Airy. But...there's now a gap in the lines and the key Market Square is now empty - Will the Hessians occupy it? They are busy reforming and rallying south of it.

Turn 7, a few Rebels run out of ammo [yellow Disrupted counters at top] but that doesn't stop them from coordinating a massive attack south against the limited and strung-out British brigades.

The first attack is by the NC regiment against Lord Howe, with the PA helping. They score well and but the British pass morale and retreat in an orderly fashion out of Germantown. The NC follow-up, advancing into the town off Mt. Airy plateau.

On the right, a substantial Rebel attack with three regiments south of Kelly's Hill results in the death of Gen. Grant! the '4' result on the CRT followed by a '6' kills him. This is a 1/18 chance, if math serves me rightly. The 3rd Brigade retreats south into town. taking Grant's body with them during their orderly retreat.

British Turn 7, they push the Hessians right onto the Rebel objective, the Germantown Market Square. The militia have all been distracted attacking the ends of the now-solid British line, and are no longer threatening the camp. This is about as good as it gets for the British, except that the 1st Brigade [far right] is one hex too far forward...

In a bruising set of encounters, two exchanges take place that the British can ill-afford. The Hessians ill-advisedly advanced before checking their flanks - neither of which advanced!

Turn 8. Lots of Rebels run out of ammo, several units are Disrupted [this gives penalties to all values: combat, morale, and movement]. They are marked with the yellow "D" counters. Interestingly, Leaders allow most D effects to be ignored, a nice mechanic.
They may not be able to exploit their hard fighting last turn for ultimate success...

In light of ammo shortages, many units pull back. A major effort is made against the Hessians by Lord Stirling and the enveloped 2nd Brigade by Sullivan's men who, one presumes, are out for revenge! But will they have it??

No! They do push into the British line, but are unable to seize the Market Square from the Hessians who conduct an orderly retreat.

At the end, the Rebels are held off from both the Market Square and the camp. Ammo shortages have lots of them Disordered [looting for ammo?] while the Brits are hanging in there pretty well. The thrust of the attack has been halted just south of Kelly's hill, and it is certainly a British victory. But hey, they lose the war, right??

Whew! a hard-fought an interesting scrap. The game system at its core has plenty of dramatic moments provided by CRT and morale rolls, along with making the best decisions possible to keep Units alive. This is a strong point for me - I much prefer games that reward players for husbanding their troops wisely instead of rashly expending them for victory.
Overall, casualties in the game are pretty light if both sides rotate units that have taken a step loss out of the battle and concentrate on stacking them with leaders to give them the best change possible to pass morale, get back to full strength, and re-enter the battle later [about 1.5 to 3 hours later]. I think it's a bit too easy to lose disruption [which often comes with a retreat option, allowing you to recover from disruption automatically if you retreated far enough away from the enemy]. You are allowed to recover from Ineffectiveness, Disruption and step losses all in the same turn. Personally, I don't see how a unit that is suffering from organizational difficulties can also recover its straying Soldiers.
The rules are clunky at times, and generated a number of questions; this is the severalth tim I've played and it seems there's always another question coming up! I am toying with the idea of submitting them to Chris Perello, the designer, or checking them out for myself in the full, Standard M&S rules, or just re-writing the quick-play rules for myself [and anyone else who wants better-organized rules].
One lingering tension I have is the large area of a hex compared to the small size of the units. You can only really fight with one Patriot unit in a hex, and a reserve is best left 350 yards behind in the next hex [which seems a bit far to me]. I think historically they'd stay a bit closer, more like 200 yards, which is still a ways back!
We'll see how much time and energy I have for this!
However, I do enjoy the occasional higher-level game wherein an entire battle is fought out. I certainly don't have the resources to fight this battle myself, and would have to wait months to do so with my gaming group that has more than enough 15mm figures. I like the level of abstraction and the 2-step process of many of the combat results, wherein a unit gets to check morale and if they pass they get a better result than if they fail. This is an easy way to use morale without getting bogged down into pages of rules.
Overall, I still recommend picking up this game - it has a lot of play for the buck, and if it is not perfect I think it is manageable for most experienced gamers to get through, including making a few decisions for oneself about how to interpret the rules.


