How Men of Quality Resolve Differences

How Men of Quality Resolve Differences
Pudel and Peper attacks - an ugly but inevitable part of any 17th C. British Civil War, "Oh! The Shame of it All!"

Wednesday, December 30, 2020

OHW Scenario #8: Melee - Playesting AWI Rules, p.1

Well, it's been a month since I posted, but a lot of gaming has been going on as I obsessively playtest my American Revolution rules. As I spent a lot of time closely reading Spring's "With Zeal and With Bayonets Only" and trying to incorporate the issues he raises for an AmRev commander, I'm tentatively calling them "Zeal and Bayonets".

My goal with the rules is to return to a pretty granular set that allows the player to make lots of the same decisions as the Battalion Commander.  At its heart, this is a BN game, altho most players will handle a small BDE or so. I like to think of it as a return to manual transmission after years of automatic - if you want to be in control of the decisions, this is the set of rules for you. If you want all lower level decisions abstracted so you can be the Brigadier - look elsewhere!  Perhaps "One-Hour Wargames"??  
:)

The drive train is largely inspired by Scott Holder's "Patriots & Loyalists", an AmRev game that I played upon its release and that still inspires me in several ways. Altho a few of the mechanics are way overengineered [like a whole page on supporting a melee] there's a lot of other things that are very evocative of the period. My favorite is Leader Risk. Basically, Holder uses a d100 system, and every time you are fired upon you have to check morale - and the BN leadership can help with 1-20%. However, the % help they give is also the % risk to themselves. You roll again after morale and if you used the Leader for 20% assistance bonus, you have a 20% chance of the Leader getting whacked and the Unit taking a Permanent Marker - once PM's = Stands the Unit is destroyed!  And Units are usually 5 stands at a 1/20 ratio.  I like this mechanic of gambling with the lives of leaders.

I also like the rolling for Actions. Holder has you roll by BDE on a d10 and you've a 40% chance at 3 Actions for every Unit, and a 30% chance for both 2 and 4 Actions. If you roll down to 2 Actions, your opponent gets a chance to act one Unit for every one of your Units. So an interactive IGO-UGO.

Of course, I didn't leave much as-is in the end, and stole some other fun ideas from elsewhere. Steve Jones' "Bloodybacks" inspired me to return to actual figure kills along with "Loose Files and American Scramble" [from which he probably got the idea]. But I like the mechanic whereby Disorder comes and goes, and can be fixed, while actual casualties are Permanent.

Anyway, those are a few thoughts for those who are interested in rules design. Ultimately my goal is to put on the table some of the friction and granularity that makes the AmRev the AmRev and the challenges its leader's faced the challenges the player faces.  I had one cold playtest with a local gamer who's great at getting into the nitty gritty and offering critique. I made several changes from his comments and my thoughts including another partial playtest solo. 

Let's see how this car runs!

Game Setup. The Rebels have two units on the hill at game start - to left is a rifle BN in Extended Order [skirmishing, basically] and to the right behind the trees is a line unit of Marylanders - so almost as good as British line [they just aren't quite as good with l'arme blanche]. These two Units have the first turn. Entering Turn 3 are two 2nd Rate Line BNs at top right, and Turn 6 another Continental Line with a 6-lb gun at top left. His Majesty's Royal Butt-kickers will enter with 3 Units on the road Turn 1, followed by 3 more Turn 4. The Victory is in being in exclusive possession of the hill by Turn 15.
Turn 1. Rebels roll high and get full 3 Actions each, so easily advance into the woods and off the hill. The goal is to fight forward enough that the hill is safe, and use the woods to advantage. Brits enter on the road, with Light Infantry at the front screening columns of Grenadiers and Highlanders. The Scots rolled up for 3 Actions so marched on for 2 then faced left into a line. The Grenadiers barely got on the table with 1 Action [this is probably a good time to mention...my Grenadiers are probably the worst performers in all my games, statistically speaking].
American Turn 2, the Rifles advance and give the Light Bobs a "volley by wings". In Z&B, you can divide up your firing sequence by Divisions [1 Base] or combine them into Wings [2 Bases]. Depending on the bonuses and how you estimate your fortune with the dice, there are advantages to dividing up your fire or combining it. Range and firing angle play a roll also. The Lights take a Disorder Marker [DM] from the long range fire.
British Turn 2, the Lights move up rapidly to give the Grenadiers and Scots some space. They needn't have bothered, as both roll only 1 Action and they lag far behind. Battlefield coordination was a constant challenge for all combatants in wild North American terrain. The Actions mechanic presents this nicely, altho the Americans aren't in a position to take advantage of it - where's a Heavy Dragoon squadron when you need it??
Turn 3, the rifles put another DM on the Lights. In return, the Lights hammer the Rifles by moving in closer and unleashing their Initial Volley. The Rifles take two Markers and a casualty, and in the process of using some Leadership take a third DM with a low Leader Risk roll - the yellow die. The green dice are the morale check.
Turn 3 ends with the Patriot reinforcements on the table, the North Carolinians in white headed to the hill while the Pennsylvanians headed straight at the Scots at high speed! Low Actions dice result in both the Scots and Grenadiers making slow, leisurely progress forward. Both are not quite in position.
Turn 4 the Brigadier dashes over to help, and the Rifles roll well for Actions. They then rally off their 3 DMs with some effort, and use their third Action to give the Lights an ineffective volley.
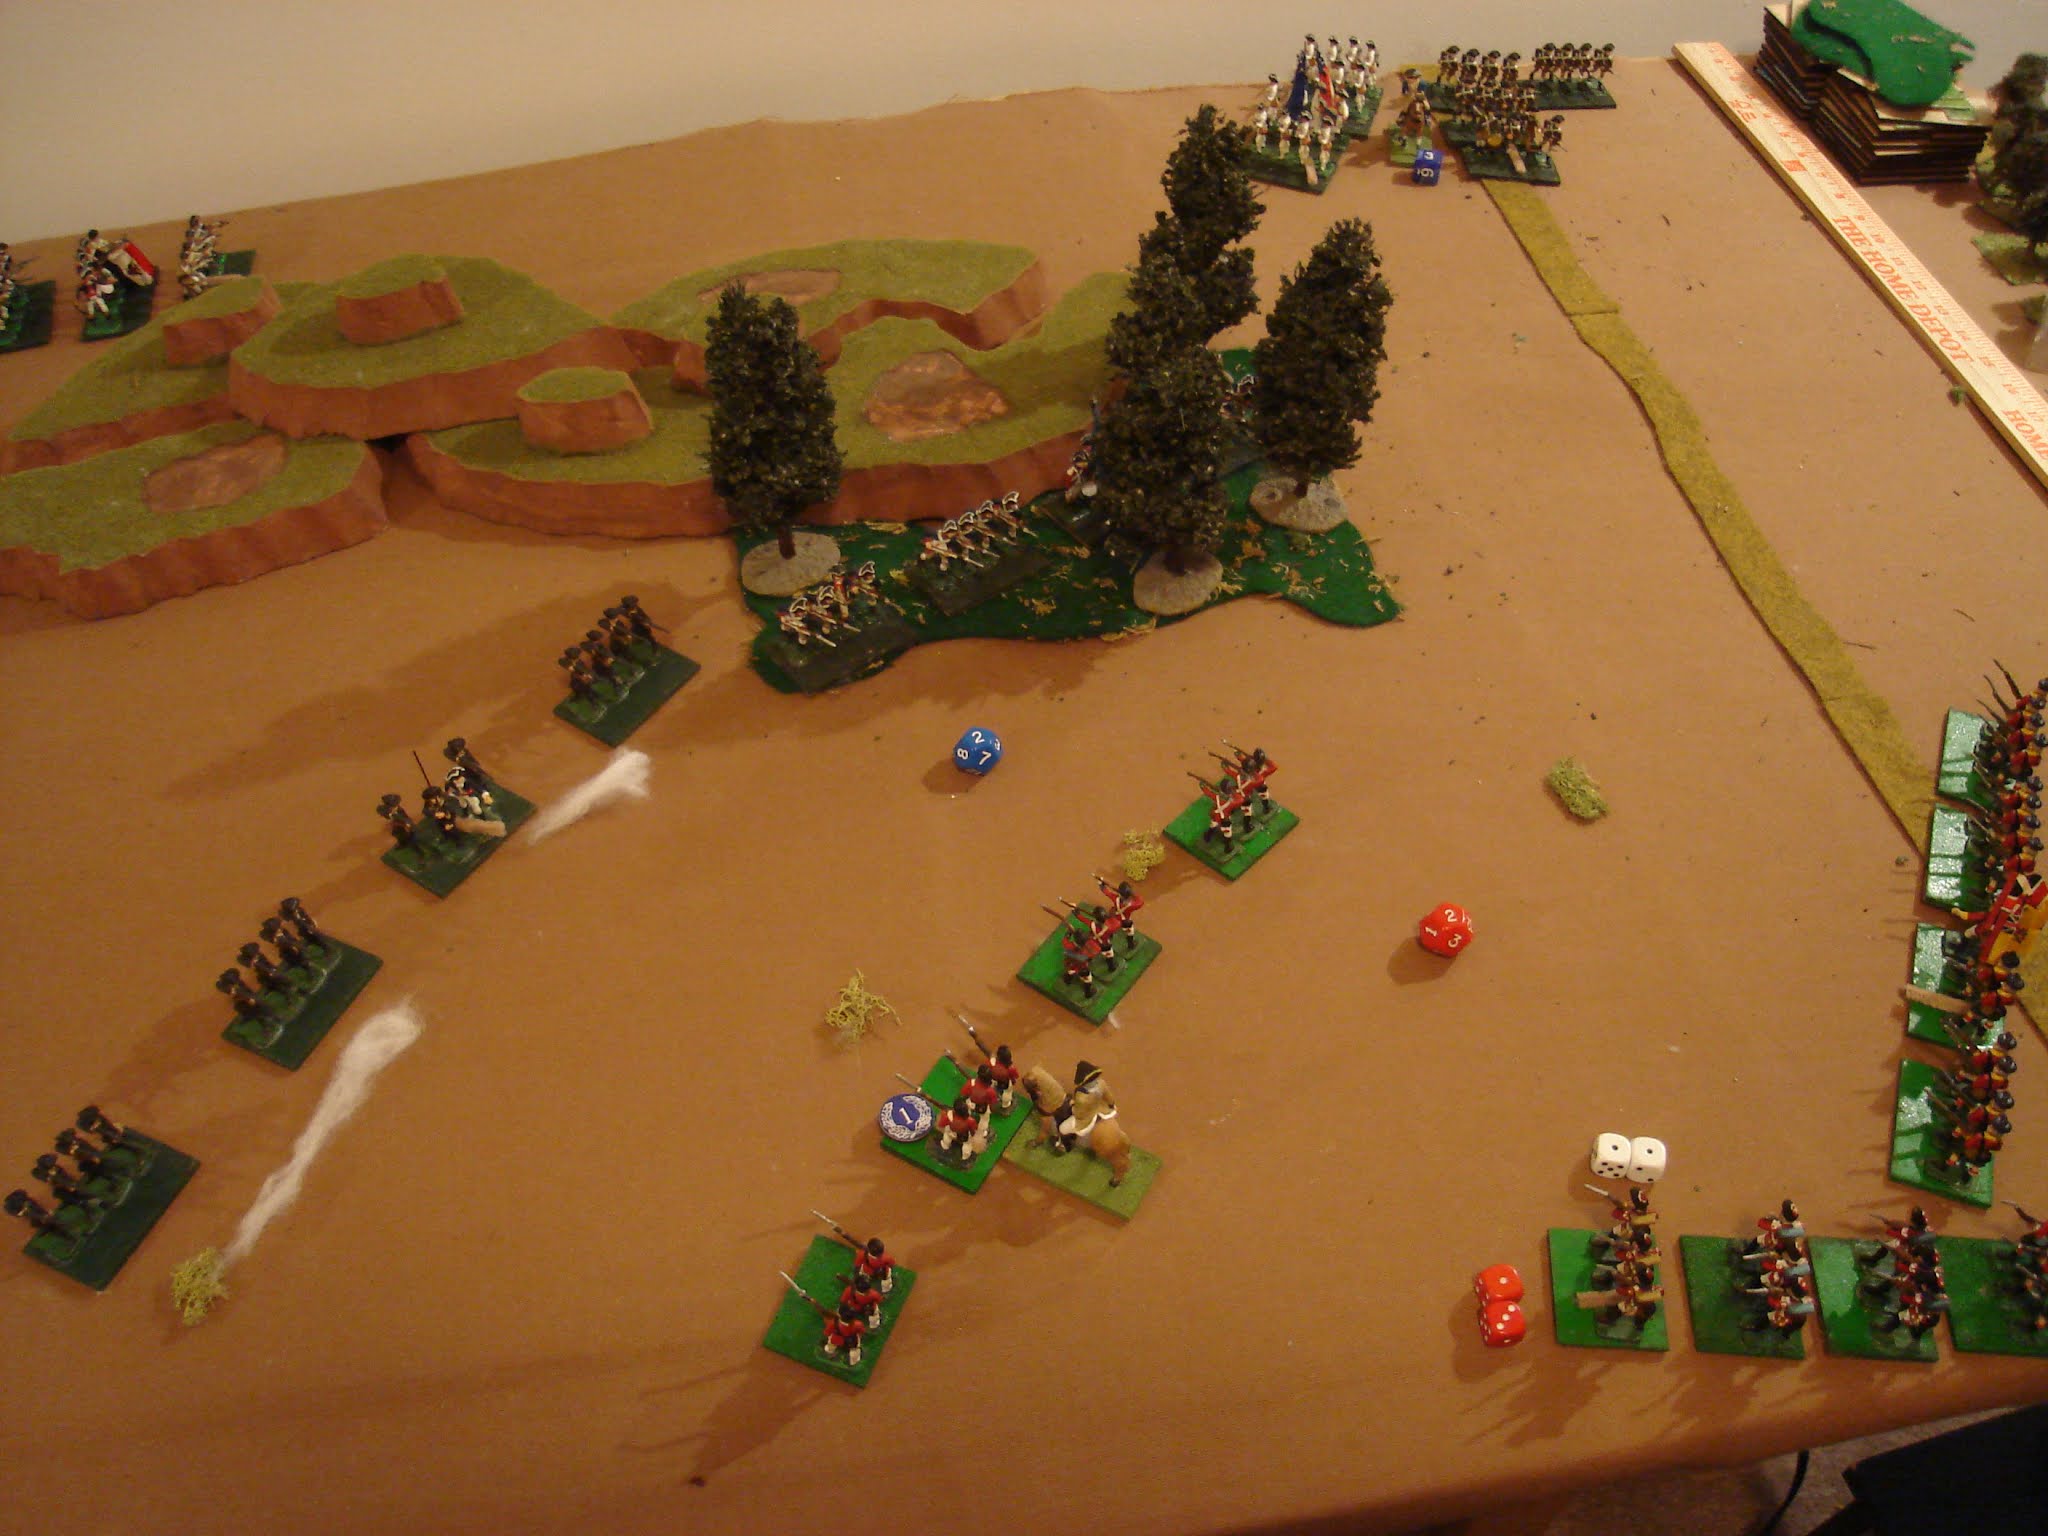
Turn 4 continues, with the British slowly advancing, and their reinforcements entering. To bottom is the 105 Foot, the Irish Volunteers. Above them is the 40th Foot, and a 6-lb gun. With the Lobsterbacks in their faces, the Pennsylvanians get a case of the slows and are barely able to maneuver. Fortunately for them, the British are in no position to exploit this problem.
Turn 5, all continue to deploy with the British faring a bit better. The Pennsylvanians have been beset with poor leadership and have only barely managed to get into some sort of fighting formation. Some disappointing Action Dice for both sides happened but where and when is impacting the battle plans of both sides. The British have been slowed while the American left is in a bit of a muddle.
Closeup: "Come and get some of this!" 
Scots in a bit of disorder but inflicting more on the Marylanders lurking in the woods.
Closeup Left: Light Bobs are screening His Majesty's Bearskin Wearing Butt-Kickers. Both need to oblique left to push toward the hill and the weak rifle unit.
Closeup Right: The 40th give lead generously to the Pennsylvanians, who fail at reciprocation - clearly a case of bad manners among the grimy farmers making up the Rebel effort!
Turn 6. The Pennsylvanians roll poorly for Actions, then blow their morale roll. They manage not to get a leader whacked, however [yellow die].
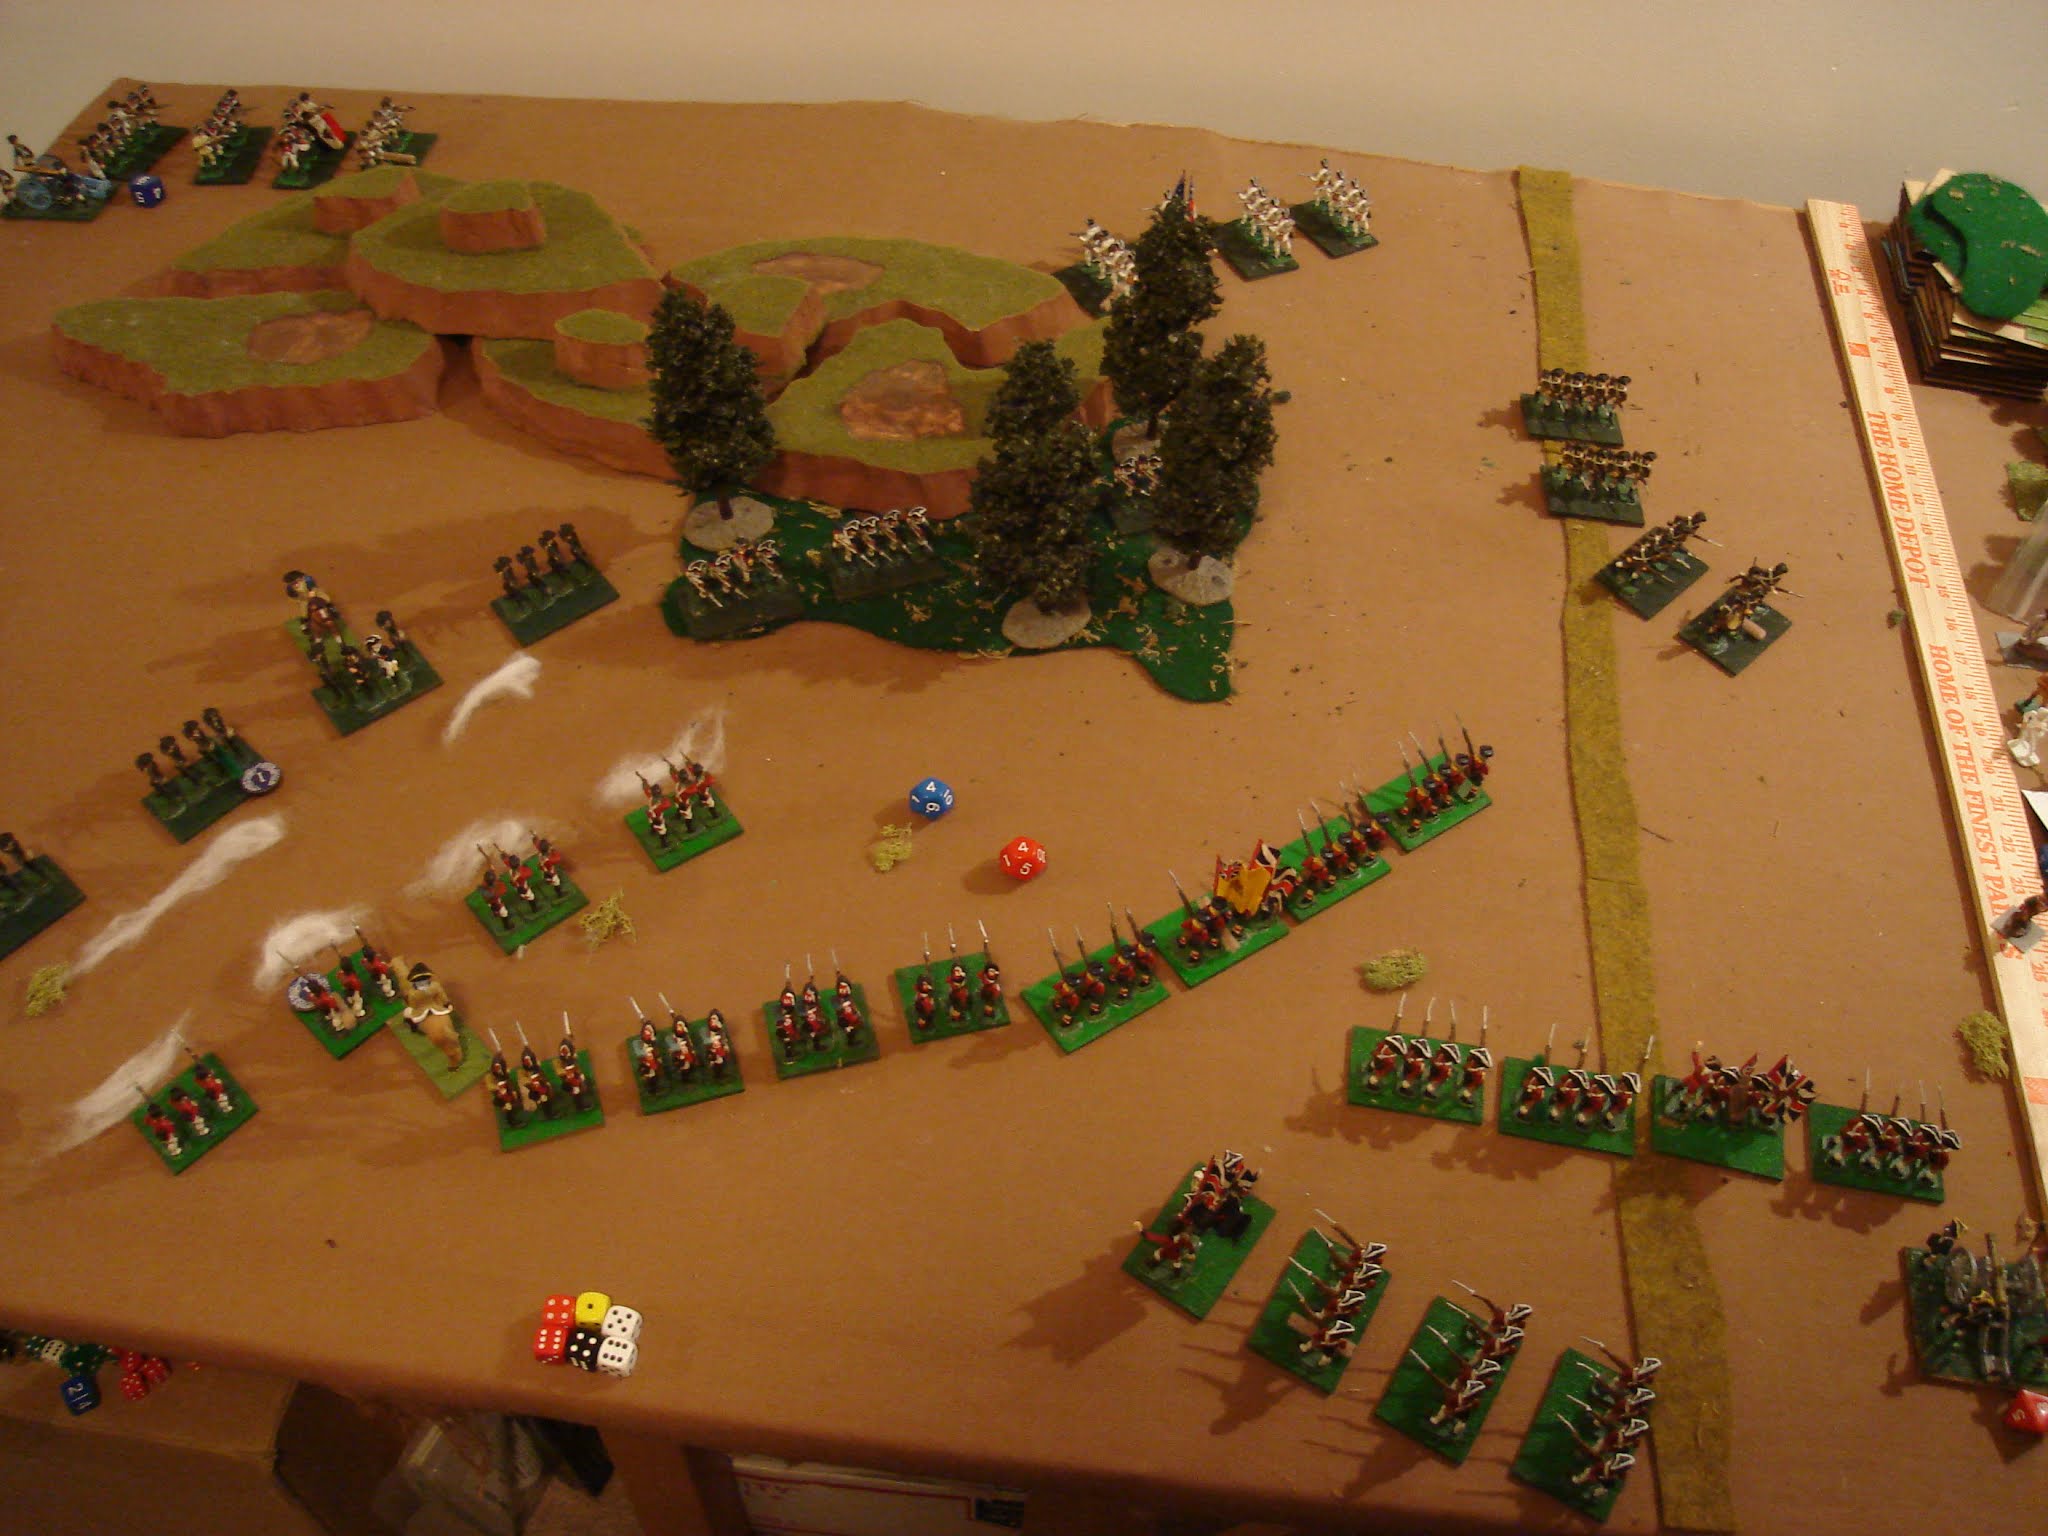
Turn 6 end. Pennsylvanians get out of the way with undue haste, and having lost a base as well. The pressure on the center and left builds slowly but surely. The British gun needs to get into action, but must've found a rut or two in the weeds as their Action rolls have been poor. American reinforcements enter - the German Continentals at top, and the light gun just upon the hill, still limbered.
Closeup from the bleachers on the right: Carolinians securing the left flank of the Marylanders who hold the key to the entire position - the woods at the base of the hill. Nice view down the British line.
Turn 7. Heavy Action in the Center. Highlanders fire wildly, and the officers lose control as the ill-disciplined bekilted Argylls succumb to the temptation to "Running Fire", where the men just start shooting as fast as they can. Altho the fire was largely ineffective, the Marylanders roll low on morale as well as taking a Leader hit, and a number of them slink off to check the parking meter. In game terms, the Marylanders failed morale but instead of running the BN stood its ground and took additional casualties. Sometimes heroism is good, and sometimes heroism is bad.  Here, the longer they hold the woods the better, so we'll call them heroes... Unfortunately, the General is knocked off his horse by a stray musket ball and has to get the wound dressed for a couple of turns!
Turn 7 on the left. The Grenadiers finally make themselves useful by providing some fire support for the Lights who tighten up from Extended Order to Loose Order and charge the hated Rifles. Close Combat is resolved in a separate sequence after all Fire, Move and Rally Actions. In the Close Combat Phase, to show the complexity and multiple possibilities of an infantry v. infantry charge, Z&B uses a card deck. Each card has a possible action or event, e.g. Defender Fires, Attacker Checks Morale, or Resolve a Melee. This is from Patriots & Loyalists, but the card mechanism is much older, going back to the Grant, Young and Featherstone era.  

[EDIT] The Lights draw a "Defender Checks Morale" card, and the Rifles need an '8' but roll a '4'. In Z&B my attempt at handling the unpredictability of morale is if you fail on an odd number you run away [a variable distance] and on an even number you stand but take figure kills of the difference [additional Soldiers slinking off, wounded or otherwise out of the fight]. The Rifles failed by '4', lose 4 figs [an entire base] but stand their ground.
[EDIT - note the second base with a splat marker] The next card is a Melee card, and the various factors are added up with the Lights getting to 16 and 3 Kills, while the Rifles only get to 5 and 1 Kill [they are halved for "No Bayonets"]. They lose...
...and execute a hasty retreat. Not only are the Rifles badly chewed up, but the hill is wide open! With the Unit at 50% effectives, I would usually remove it...
Turn 7 end. With the Marylanders making a stand in the woods supported by the North Carolinians, reinforcements arrive and prepare to hold the hill. The Rifles and the Pennsylvanians are in poor shape. Perhaps I was a bit TOO forward with the American defense? Some dice rolls have hurt them, also.
Turn 8. The Marylanders rally themselves a bit, while the Scots throw some weak, ill-disciplined volleys at them while the officers fail to restore order. They only need a 5+ to pass a Quality check and resume firing discipline, but they rolled a '3' on 2d6!  They still got a Hit, anyway.
This is followed by a second Running Fire that is ineffective, but the officers regain control with a '7' on the Quality roll. Some precious time was lost with ineffective volleys!
Turn 8 end. The Scots are a bit stalled in center, while the 40th and the gun beat up the Carolinians and the Pennsylvanians try to get themselves back in the action, but roll poorly for their rallying.

Turn 8 on the left. The Lights and Grenadiers sort themselves out to continue the push, backed up by the 105th Irish. Unfortunately, the Continental German unit moved quickly and is now in position, supported by the light gun. The Rifles are pretty much spent, and will have to find a safe place from which to peck away at officer's or something.
Well, the action has been pretty intense. At the halfway mark of the 15 Turn game, the British have torn up two Infantry battalions and damaged a third that is holding the critical ground of the woods. They certainly have the potential to push through the woods with the largely undamaged Argyll Scots. The Light and Grenadier Units are both a bit small to assault a fresh unit on a hill with artillery support, but perhaps the Irish will be of use?  

We'll see what tomorrow brings.

I hope the playtest is giving you a taste of some of the things that give the right "feel" for the period for me, as well as some rule sets that have mechanics I like enough to tweak and work with until I get the right blend. I think rules writing is mostly like cooking - you can check out a lot of recipes and taste a lot of food, but in the end you have to find the right recipe for you and those whom you will host!

Thursday, November 26, 2020

It's Scruby - tastic! Gaming Thankfulness


http://vintagewargaming.blogspot.com/2011/09/helpful-hints-from-jack-scruby-1962.html [nice blog, btw!]

My very first miniatures game was about 38 years ago with North Penn Wargamers. It was an American Revolution game, and these are the figures from it!  They appear to be mostly Scruby, but there are some others that are different in style that I'll have to figure out over time. I remember being very excited about how it all looked and the prospect of battling it out on the table, but I did get crushed. The player was nice about it, however, and gave me some tips that could prevent that in the future...uncertain I learned them but he tried! 

As they moved around the area the name changed but amazingly most of the main hosts and visitors are still in the group. A few have rolled their final boxcars but one of the original hosts has been paring down his collection and among his offerings were these - now largely unwanted - old school figs. The group replaced them decades ago with nicely detailed and historically accurate [and proportionally sculpted] 15s and they've been collecting dust ever since.  I immediately jumped at the chance to have them, as I've been looking for an old-school project for a while, and it is especially great to have something with fond memories.  So "Thanks Dave" and I wish a wonderful Thanksgiving to all the group.

Well, "enough nostalgia" you are probably thinking, so let's see what is happening with the little loyal lead fellows!

Below is One - Hour Wargames' classic Scenario #4 "Take the High Ground". In this context, I imagine that the far right of the Rebel's line has been flanked, and two regiments of State Line were dispatched to hold the only piece of high ground dominating a road leading to the main army's baggage train. As they hold it, the main army has dispatched two Continental Line regiments, a Rifle regiment, and a 6lb gun to support them against the flanking force, that outnumbers them 3-1. 

How much of the patriot's blood will be spilt upon the Altar of Freedom today?

View from a nearby church tower - PA and NC State Line hold a gentle rise near the road. Gen Washington has sent reinforcements that are about to arrive on table.


Closer view

Rules are a variation on Neil Thomas' Napoleonic rules. Using D10 and the leader intervention and risk rules from Patriots and Loyalists. Argyll Highlanders and Anhalt Zerbst battalions engage the Rebels.

Fire at long range is exchanged.

Loyalists, the Royal Artillery and a composite Light Bn take up positions on the right.

Reinforcements rush to the scene as the State Line sees their flank being turned by the Loyalists.

The reinforcements head to the hill, letting the Lights keep the woods. Hill is the objective.

Fire continues as the rifles and gun secure the State Line's left.

Some intervention from Gen. George is needed to steady the State troops.

Loyalists doing their part - and rolling well!

The Scots fall back in confusion, despite intervention from their charismatic, hard-drinking former clan chief. The Hat Companies of the 105th move to replace them in the battle line with the gun.

Highlander's viewpoint from their disorderly mob.

Turn 4 sees a burst of activity for the Kings Army - they rolled to have more actions than the Rebels.

The lines continue to develop. At top, the Lights threaten the gun while the riflemen hold off the Loyalists. The large German regiment holds the center by itself, as the redcoats move to fill the left. The highlanders have reformed in good time to oppose the oncoming Continental Line unit.

Gen. Washington is pleased to see a burst of activity for the Cause - the water symbol is the "10" on these dice.

As the Lights close in, the gun lets loose a furious barrage of cannister getting four hits. But timely intervention by the British Brigadier steadies the men and they are ready to press on.

And he suffers no wounds, either.

Meanwhile, at the critical point, the Germans close in but lose a stand in the process.

The Battle on turn 6 or so. Loyalists and Lights have closed in against the left, while steady pressure continues against the High Ground, with the Scots having reformed their line. The Royal Artillery skip cannon balls into the flank of the Carolinans, but it is a narrower target than they thought.

Can the Loyalists break the Rifles? Perhaps a bayonet charge is in order?  Or is close range Fire enough? I am contemplating having the Lights overrun the gun, also.

A fully positioned army of rebels makes it unlikely that Gen. Washington's flank will be turned, today. But maybe some more opportunities will arise in the future?

Well, this was fun but I decided I definitely wanted to try out a couple of other sets of rules, including Andy Callan's "Loose Files and American Scramble" and Scott Holder's "Patriots and Loyalists".  It was great to put these guys on the table, and they will occupy it for the holiday weekend at least.

Good gaming from a better time!

So a happy Thanksgiving to all and for all our friends in the occupied zones:

"The Chair is Against the Wall"

"John Has a Long Moustache"

Friday, November 20, 2020

Wargaming a COA Analysis in OHW Scenario #12: An Unfortunate Oversight

So, in the last post, I examined one COA: assuming the French put an Infantry Unit in the town, was it worth opposing it with a Russian Infantry supported by two batteries of Guns? The answer was that the French Infantry would - just barely - be destroyed in four turns, with a badly damaged Russian Infantry taking the town on Turn 5. As the town is a good location to project Fire from, it seems like it might be a good Supporting Effort to the Main Effort - an attack against the hill. 

However, the following field exercise showed that the main effort will be in battle not later than Turn 4, possibly Turn 3 if the French are aggressive. They will almost certainly need the Fire of the Artillery to support them as their attack will most likely be at 1:1 odds, and as the Russians will be on the move the French will get the first shot.

An important fact to remember about OHW - Units are 100% combat effective until "destroyed". Destroyed really means "combat ineffective and withdrawn from the battle". A OHW scenario is a short, sharp encounter, that doesn't have time for Units to rally, reform, and get stuck into the fight again.

From that analysis in the last post HERE, the best Russian COA is to keep the guns as far from the town as possible, and push all their Infantry over the ford led by the cavalry. If the French decide to use a Unit against the Artillery, it will probably not destroy them before being destroyed itself. But let's see how it works when the opposition gets a vote!

The below wargaming of the COA used the OHW rules with necessary additions to complete them from this list HERE. Dice were D5 average dice, with 2,3,3,4,4,5 on them. This minimizes the chance factor to emphasize planning in this training exercise.

End of Russian Turn 1. The Artillery inflict 5 Hits on the French, while their Cavalry lead the way followed by the Infantry crossing the ford. The French in the town take only 1 Hit [and that only because ALL fractions are rounded up!].
End of French Turn 1. They are moving rapidly - more rapidly than the Russians crossing the ford! They inflict 3 Hits on the Russians fighting the town [a losing proposition for the Russkies] and the Cavalry. Their Lights are setting to oppose the Artillery. They rallied off 2 Hits on the damaged Infantry in the center. They certainly are starting strong!
Turn 2. Russian Infantry continues crossing while their cavalry take a beating from most of the French army. Still, the Cavalry and Artillery battered one French Infantry into retreating. I almost think the Attacker needs one Unit to start across the ford, or perhaps one more unit?
Turn 3. The battered Russian Cavalry have swung far out onto the flank, distracting the opposing French Cavalry and making space for the oncoming Infantry. Still, the French have the central position, and the Russians are too spread out to concentrate their combat power.
Turn 4. Well, that was a surprise! The Russian Cavalry destroyed the French, after supporting Fire from the Infantry and Artillery softened them up. Still, the Cavalry and one Infantry are on the rocks, while the Infantry opposing the town have left the battle and the French Lights have put the hurt on one Artillery Unit.
Turn 5. Unsurprisingly, one of the Russian Infantry folds. The French begin to advance against the Artillery from the town. If they silence the Artillery, the Russian's attack will be over. The French choices: play conservatively and husband their damaged Infantry while trying to finish off the Russian Cavalry and one Artillery Battery, or advance?
French vote for the wrong COA, apparently...leaving the flank of their Infantry on the objective open to a cavalry charge. [Obviously, the French staff were taking pics instead of doing their job!]. I probably should've just ignored my carelessness, but I love the drama!
BANG! Ouch...
Bye-bye...
Turn 6. French compound their error by rolling poorly on the shot that had a 5/6 chance of destroying the Russian Cavalry. Another bad COA!
Turn 6. Well, we officially have an even chance here. The French have two Infantry by the objective, while the Russians have battered Cavalry, a good Infantry, and Artillery support - altho one battery is about to go. I thought the French fought WELL in the Napoleonic wars??
Turn 7. Russians go for broke and charge, destroying the French Infantry. They lose one battery. Overall, this still seems like it is favoring the French...
Turn 8. The last French Infantry holding the objective is destroyed by concentrated Artillery and Infantry Fire. Plus the Cavalry were looking for more vichyssoise.
Turn 9. French Lights show they are made of stern stuff - they turn around and whack the Cavalry with sniper-like efficiency. They needed a '5' and got a '5'!
Time to return to Moskow, Ivan.
Turn 10. The firepower is very similar, but the French Lights are still rolling hot!  But they are in a crossfire. Meanwhile, the French try to wipe out the battery.
Turn 11. French lights decide they've done their share and head back to town - maybe the cafes are still open?  Time for a little joi de vivre!
Turn 12. Russkies reposition themselves to finish off the French.
Turn 13. They see them off - maybe they'll join the Lights in town? Russians still have two turns to be on the hill, and have two Units left - albeit somewhat battered.

Analysis
Well, it looked like the French had things well in hand. They made two errors:
  1. exposing the flank of their Unit sitting on the objective, and,
  2. advancing out of the town against the Artillery.
They should have shifted the town Infantry to the center to hold the objective.

Russians made the most of their firepower and altho it was rarely decisive on its own, it certainly had an effect in the long term. With its 48" range, it can cover the table for 1.5 Hits a turn per battery, which destroys a unit in 10 Turns. In 15 Turns of continuous Fire, the two batteries are capable of destroying three units, theoretically. I think the move with the Lights was good, taking out one battery helped.

In terms of the original question, the Russians made the right choice to keep using the guns against the objective and not be distracted by the town.

Overall, the Russians put together the best plan with the forces at hand. They stayed focused on killing units and taking the objective. They capitalized on French errors, and the French got a bit overconfident and spread out too far. I'd say that there was some good dice on both sides, but in the end the Russians won a hard-fought and well deserved victory.

Conclusion
I hope that these posts have given the reader some food for thought. It is essential if one is to edge out the opposition in a tightly contested game - and most of the OHW scenarios are pretty close - to develop a plan, evaluate a couple of the COAs and choose the best ones. Here, the Russians would have struggled to expand their bridgehead and seize the objective if they had invested too heavily in seizing the town, despite the firepower advantage they had.