How Men of Quality Resolve Differences

How Men of Quality Resolve Differences
Pudel and Peper attacks - an ugly but inevitable part of any 17th C. British Civil War, "Oh! The Shame of it All!"

Sunday, October 31, 2021

EC-BC Playtest Series 4: revisiting the revisions, Part 1


After much eventfulness in the world - which swept me up into it - I was finally able to return to Eagles Cheaper than Brain Cells and see the last set of revisions with fresh eyes... in fact, I had sort of lost track of exactly what had happened, and had to refresh my memory as well as the eyes!  Fortunately, I had scribbled plenty of notes from the last playtest sessions almost a year ago with an experienced game pal, Ken.

First thing was to try a new scenario, and #19 Blow from the Rear was just the ticket.  Outflanking a river obstacle turns the scenario from an obvious defender's advantage to a desperate defense on Turn 6.  There is always a bit of trouble with a flank attack if both sides [me, and well, me] know it is going to happen.  

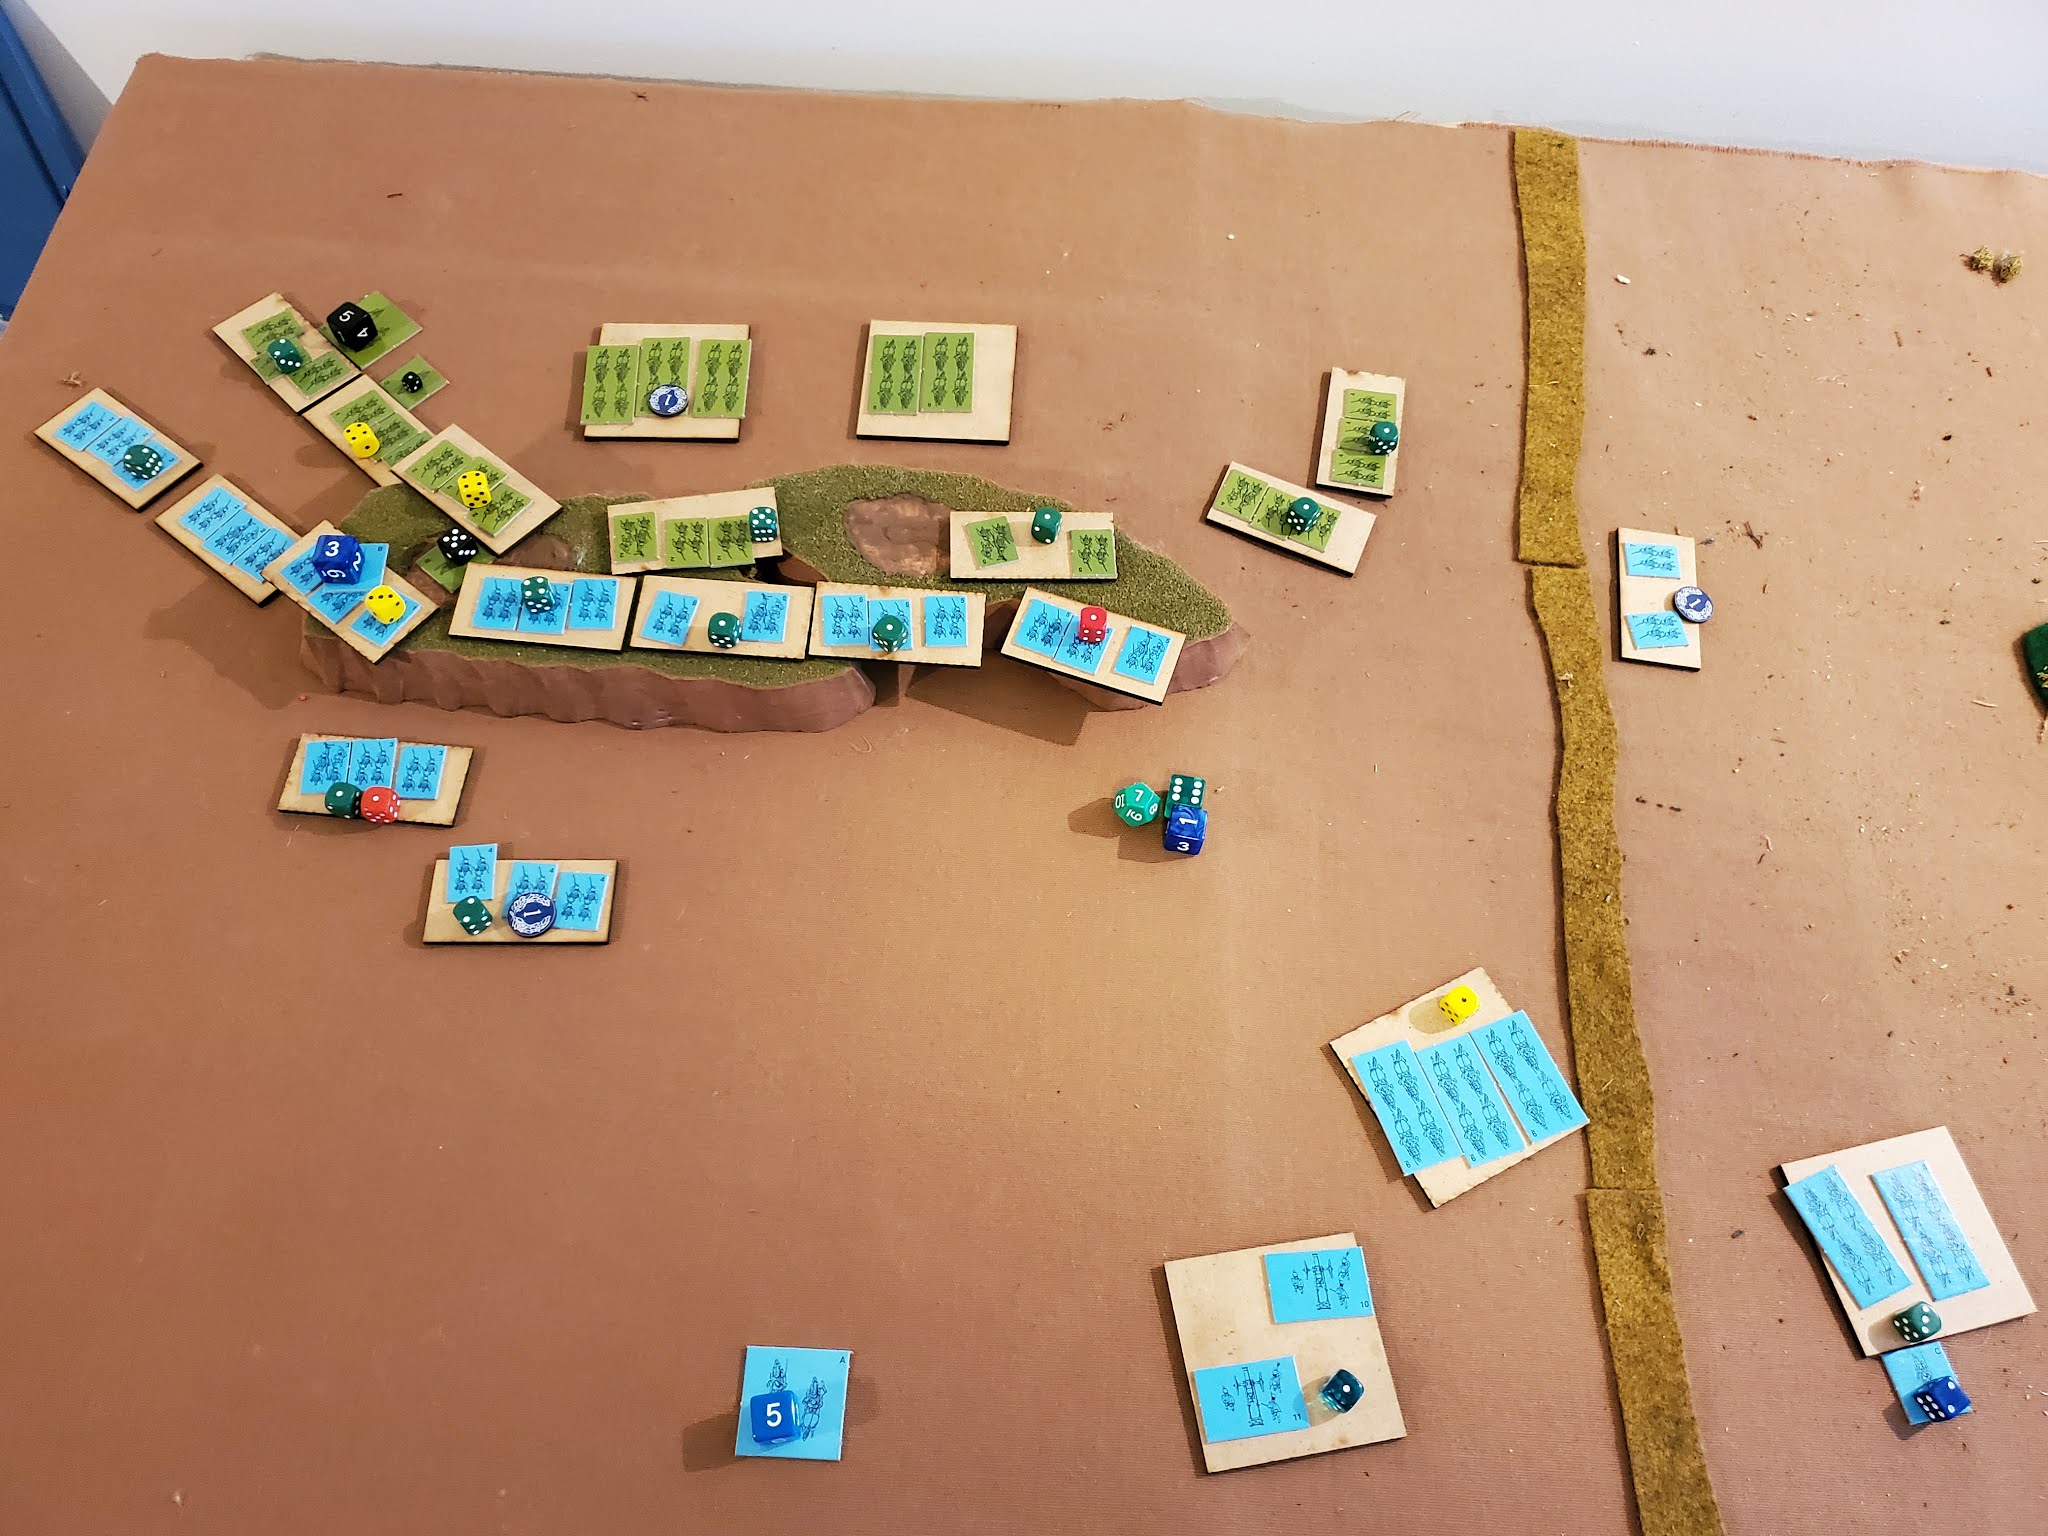
This scenario attempts to balance the tension with the setup. The attacker starts with 1/2 his force entering from board North to contest the two crossings, opposed by 2/3 of the defense.  The other 1/3 of the defense is in reserve in the shaded area to bottom right.  On Turn 6, the other half of the attacking force enters from the West, south of the woods. On Turn 7, the defender's reserve is free to react to this unpleasant development.
Couple interesting things to note about this scenario, is that using the random force generator can make for some challenging forces for either side.  Certainly, both side's forces at the river will get the most use out of artillery - the attacker needs it to soften up the defense and force a crossing, the defender needs it to weaken the attacker's holding force enough that it can only cross with assistance from the flanking force.  Cavalry for the flanking force and defender's reserve will be very handy. 

The Victory Condition is pretty demanding on the Attacker - he must clear both crossings of any enemy units for 6" in every direction. 

All in all an interesting tactical challenge for both sides.

Increasing both sides to ten units [rolling once each on the 6 Unit Force Table, and once on the 4 Unit Force Table, p. 64] resulted in the below forces:
Russians - 3 Artillery, 5 Infantry and 2 Cavalry
Austrians - 1 Artillery, 6 Infantry, 2 Cavalry, and 1 Skirmisher
This worked out nicely, with the Russians having the capability to push at the crossings thanks to a significant artillery advantage, and the Austrians having the only Skirmisher to operate effectively in the woods, a good defender's advantage.

To get the feel of the newly acquired N-Scale Scruby figs, I left them on the bases they came with and used 3" square sabots [1.5" x 3" for the Artillery] in the style of Volley & Bayonet. As both EC-BC shares the same ground scale as V&B, and Frank Chadwick makes a convincing argument for the 1"=100y ground scale, it seemed appropriate to try this out. The units are a little narrow for OHW, which recommends units 4-6" wide at the front.

Below, the most obvious setup to me: Russians have their Grand Battery and two infantry north of the river - they should be able to soften up the Austrians for the flanking blow!  The Infantry can then cross, hopefully threatening an Austrian flank. Austrians put the Skirmishers in the woods, their lone battery, and four Infantry to hold the crossings. The big question is if the Artillery can be kept in action effectively enough to weaken the infantry for an attempt at either crossing.
The Russian flanking force has three infantry and two cavalry. They will be striking against two Infantry and 2 cavalry, not much of an advantage!  The main area of advantage is the mass of artillery to the north - can it project firepower effectively enough to help the Russians with what is a 1:1 attack? We'll see!

The guns are actually Austrian, and there's some pretty generic Russkies with a general.  9mm / N-scale doesn't need a lot of details - it's the overall effect that counts. I think they look pretty good, uncertain I like the squares...

Three Austrian line and to left grenzers which will be another line unit today.

Austrian Reserves: a line and a grenadier [these Assault a bit better in EC-BC]. Behind, my favorite uhlans and an hussar regiment.

The Russian flanking force of an hussar and cuirassier regiment and three infantry brigades.

Over the first 5 Turns, the Russian artillery managed to consistently roll poorly, but still heavily damaged two Austrian Infantry brigades. It may be that I held them too close to the river for too long.  They should have conceded the crossing.
Still, on Turn 5, the Austrians seized the Initiative and managed to successfully Rally off some hits and position a strong defense.
The Russians still felt the odds were in their favor to take out the weakened Austrian brigade at the bridge, so Assaulted across!  They also rolled well, inflicting 3 Hits with 5 dice, and only took one back on 3 dice. This was enough to destroy the Austrians and they took their general with them in the rout!

On Turn 6 the batteries battered the grenzers off the table, further securing the bridgehead! 
But the Austrians counter-attacked, and despite the Russkies desperately rolling above average they were destroyed, too weakened from their Assault to hold out against a fresh Austrian brigade.
They then position their infantry against the oncoming flanking force.
As the Russians enter, the issue seems quite in doubt - there are 8 Austrian units south of the river, and they must be completely clear of both crossings for the Russians to win. The first crossing isn't even cleared yet, but I doubt any Austrians will want to stay within effective range of the guns!

By Turn 8, the Austrians had pulled back a bit and conceded the first crossing. The threat of the cavalry and the guns was too much - they'd be in square in response to the cavalry and give the Russian batteries a fire bonus. The goal now is to contest the second crossing.
This choice was also propelled by the dreaded 6-1 split on BOTH general dice rolls, the Russians rolled 6 orders each and the Austrians 1 each! Basically, the Austrians were fortunate to make an orderly withdrawal before the Russian army was all upon them!

By Turn 11, the battered Austrians were desperately trying to use their light battalion and cavalry to slow the Russian brigades. The re-positioned Artillery were a menace to Austrian attempts to stay near the second crossing. With both Austrian infantry brigades at over 50% of their Hits, and fresh Russians to the front and a re-positioned battery to their right, the Austrians had no hope of contesting the far right crossing four more Turns and conceded.

Well, I can't say that I played the Austrians to their best potential, but the massing of three Russian batteries was decisive at the river crossings. They rolled poorly for most of the game, but still managed to crush anything within 6" of the crossings as they have a 12" effective range. In this sort of scenario, they provided an invulnerable base of support that the one Austrian battery couldn't handle - it survived, but only because it backed off to find targets elsewhere.

Realistically, in my mind, one of the batteries would have been with the flanking force. In terms of the scenario, I should have pulled back the Austrians from the bridges, let the two measly Russian battalions cross and tried to crush them when they did.  At over 12" range, an artillery battery is half as effective.  On average, all three would get two hits a turn at over 12" range, which is manageable. It is an open question if the flanking Russian force can handle the full weight of the Austrian Army, should it successfully use its central position to shift its combat power to its left on Turn 7.

Hmmm...maybe I should try that next time??

As for the rules, they played just fine, but I was a bit rusty. I somehow managed to forget the shorter range for the infantry, but it didn't make much difference as it was the same for both sides. I was satisfied with how they played - very satisfied - and feel they give a great attritional model that also limits maneuverability in a simple way, even if that is not always realistic.

It does seem that individual units should have some limited means to self-order or react to events.  That could be a complicated mess of rules if it is allowed to get out of hand, but perhaps a simple mechanic for that would be OK.

In any event, it was a great time, and I enjoyed the look of the small, massed figures, and look forward to another play of this exact scenario!

Saturday, October 23, 2021

EC-BC Playtest 3: Big Russia Battle

Seize that hill over there...you have ONE HOUR to do it!
This is from a game of EC-BC ending a period of intense playtesting last November.  Several rules issues came to light and the mechanics were worked and commented upon and modified during some in-depth discussions. Among the key issues were:
  1. a shortened Fire range for Infantry
  2. restricting charges against stronger opponents, and 
  3. keeping orders on Units until they were used

Scenario #4 "Take the High Ground" is one of the two classic take the hill scenarios in One-Hour Wargames. At the Grand Tactical level, it's not so much the hill as the pacing of reinforcements that make the scenario a challenging and realistic fight.  This level of action is what Eagles Cheaper than Brain Cells is about, along with the classic Volley and Bayonet. 

In his notes on those rules, V&B designer Frank Chadwick correctly stresses that timing is the critical issue of battle results at the grand tactical level. The arrival of a division or corps on the right road, at the right time, could change the course of a battle completely, as at Marengo. Marching to the sound of guns - thinking of YOU, Grouchy and Blucher! - or picking the right route to arrive in the right battlefield location at the right time are all decided at the Corps or Division level, so it is important to include it when wargaming at that level.

Scenario #4 has an aggressive and well-timed frontal assault at 3-1 odds going in against the hill. On Turn 2, the attacker should have Fire on the defenders, and be ready to charge the weakened defense with cavalry NLT Turn 3 or 4. Meanwhile, the other 2/3 of the defending force is racing to the rescue from the road entry point starting on Turn 2. Any cavalry must get out ahead at max speed, provoking some interesting situations as they attempt to prevent the defense from being encircled.

Below shows Turn 2 and my take on the correct plan for the Attacker - push hard with the left in an attempt to align the battle DOWN the ridge line from the left, not AGAINST it from the front. This forces the Defender to leave the hill, at least in part, reducing their advantage. The valley, in my experience, is something of a trap but French skirmishers were aggressively moved to secure it and then block it with most of the available cavalry. The cavalry can quickly threaten the Russians if too many rush to save the Russian right, so exert pressure without even being committed. Eight French Infantry Brigades are moving on the hill, over half flanking the Russian right, while the frontal pinning force is working to catch up. In ECBC, you have a limited number of orders each turn, like in the popular ancient rules DBA, so may not always be able to maneuver your force the way you want.

Below, the battle lines developed almost according to the French intent. They are using their grenadiers to push hard at the hinge of the Russian position, but are taking plenty of casualties along the way. The strong Russian advance to the hill is being reacted to by the French cavalry and light infantry, who are now free to pressure the Russian left. The frontal attack also is going well, with the Russian battery destroyed and one Infantry in bad shape.

Turn 7 end - the Russian infantry atop the hill has been destroyed in what can only be stated as a series of amazing French Fire rolls, and poor Russian ones. It happens... The Russian cavalry behind the hill make a desperate series of charges, but to no avail.

Turn 8, the Russians have been annihilated, with the help of supporting battery and cavalry. The tactical situation was shaped by a combination of lucky dice rolling, like any game, and the availability of orders, but most importantly by how the orders got used to rally and reposition units. ECBC has enough friction that altho the decisions are the most important part, the battle is occasionally decided by dice if all player factors are equal. Here, I played both sides well enough that the decisions didn't matter as much as my fortune for the French did - and I'm OK with that.

Well, that was a bit lop-sided. Altho the French had 3 units over the Russians, I thought that the hill position would help them last longer. I also made a few poor decisions for the Russians in the first few turns, largely due to unexpected opportunities the French took. Personally, I find that each turn I can get so into the head of the side I'm playing when I'm playing solo, that I usually make a few genuine errors or just miss a few possibilities! Overall, a solid French victory that was in doubt for a few turns but the Russians fell apart quickly when they fell apart.

In terms of rules mechanics:
  1.  the charge restrictions make a lot of sense for Infantry, just not so much for Cavalry. 
  2. Keeping the orders on a Unit until spent didn't make a lot of difference in combat, but it made Units a lot more responsive to sudden opportunities to maneuver than in real life - didn't like that. 
  3. The shortened range for an Infantry unit is fine.
This concluded last year's development of the rules, thanks to some help from experienced wargamers who volunteered their time to try them out. Soon, I plan to post on the recent return to these rules, my interest being spurred on by the generous donation of Scruby N-scale Naps that my old wargaming club donated.

Sunday, October 10, 2021

OHW #10: "Late Arrivals" - Playtesting AWI rules p.4


This is another interesting scenario, and I've mostly played it with the dark ages rules, or my own feudal OHW rules. The attacker is arriving from board Northwest and must capture a town at board Southeast. The road passes thru a valley between a large wood and a rough hill that is impassible to all Units. The defense is heavily outnumbered but the attackers are cramped for deployment space, and as they advance towards the town more defending reinforcements enter.

So, a nice variant on a gap crossing and race against time.

Below, the British have moved onto the board a couple turns. Hessians back left, British line in front, one gun in center, and the Lights against the woods.  In there are a Virginia Rifle unit [Morgan's] and on the road is a unit of South Carolina continental line. The Rebellious Subjects of King George III are hoping the woods will help them hold until the reinforcements arrive. The British are quite strong in the center and could outflank the Carolinians. 

Below, the Lights fell back from the unrelenting fire of the VA Rifles, who then shot a gunner, also. They are being outflanked by the British line who must continue forward and not bother with them.


Below, a closeup of the British line leading the way, from the point of view of the Carolinian Continental Line. The British appear to have lost an officer and one figure to the rebel musketry.  In the woods, the Lights are not sweeping away the rifles as planned and have become a bit disordered.

Below, the lights lost a figure killed and had to check morale - they decided to fall back and have a spot of tea. This leaves the gun vulnerable and it takes a hit.

 Pressing onwards, the British line and Hessians caused the Carolinians to fall back as well. However, they are being helped by their first reinforcing unit, a Virginia Continental Line. The question is can the Hessians and Line take on the Continentals blocking their route to the town?

We played a few more turns, and the issue was still in doubt. While the British troops are superior, they spread out a bit and the victory condition of taking the town is quite demanding due to distance and the two reinforcing defenders - you can't just stand back and plink away in this scenario. Perhaps with the Gun, the British Foot and the Hessian, they'd be able to do it, but with two units hung up away from the objective, I doubt it at this point.

Despite being unable to finish, this was another enjoyable playtest. The rules were smooth and as always I got a few good tips from the host who offered some helpful points and criticism.

Another series of playtests was performed at a different gaming buddy's house, using his lovely realistic Perry figs, nicely painted, as well, and lovely terrain board.

This is a Battle of Edgehill scenario, so the two 2-level hills at the center represent the area of heaviest fighting, and the the house and bridge the Fitzwater house and bridge on the modern Susquehanna Rd. The Americans start with a couple units on the hill and have a few more coming to help.  The British want to seize the hill and the bridge in preparation for an attack against Washington's main body which is on the next ridge...about where all that sci-fi stuff is piled up!  Just visible on the other side of the bridge is a reinforcing unit of American infantry and a gun.
British has the usual bodies of solid to crack troops, including Hessians and Fusiliers. Plus there's more of them - the Americans only have the advantage of position.

Below, the Marylanders pepper away, and Morgan's riflemen hold the rough ground at the base of the hill. The Brits advance a gun, fusiliers and some line, I think.

After a few turns , the American gun enters and takes a position squarely upon teh road in the saddle of the Edgehill. Unfortunately, it advances a bit too far and when the Marylanders fall back [well, run away, really] it is overrun by some vengeful fusiliers!

Below, Edgehill is mainly in British hands.  Can the Americans hold the bridge and prevent it being used as a staging point for the next phase of Howe's attack?  Entering at top left are two more American line units, while those that held Edgehill are now formed up at Fitzwater's house, mill, bar and grill.

The gun pounds away at the position. The fusiliers take over the American gun!
The defenders flee the pounding from the guns, but the captured one has run out of ammo, while the American reinforcements are threatening the British left.
To their right, the British Foot have advanced and broken Morgan's riflemen. Aside from the flank threats, it seems there will be no problem for the British to secure the Fitzwater house and bridge.

This was the last cold playtest of the rules before things got too crazy last winter for me to even record the games. Again, I received a lot of great feedback and suggestions which definitely helped shape the rules.  There's nothing like gamers who are both experienced AND read the rules [and in one case publish rules] to help develop game mechanics and smoother flow of play.

Monday, October 4, 2021

OHW Scenario #8: Melee - Playesting AWI Rules, p.3

In this playtest of One-Hour Wargames #8, I switched around the American battle plan a bit. They started with the Rifles and Marylanders on the hill - the Rifles immediately entered the woods to plink away at the advancing Brits.  Their reinforcements were the Pennsylvanians and the Gun, which came in on the road. They immediately raced the Gun to the hill, and rolling well, managed to reach a suitable position to fire in just a couple turns. The Pennsylvanians kept a respectful distance, hoping to stay alive and a threat for as long as possible so that the British 40th Foot in front of them wouldn't be free to maneuver.

For the British, the problem is the same - they need to secure a hill but there's a woods in the way, and enemy reinforcements threaten first their right flank then enter right behind the objective. Generally speaking, I feel that Scenario #8 favors the defense a bit, and only in a few of the periods in the book can the attacker take it.

This time, the Brits push the Highlanders hard down the table edge to the left, where they face right and are past the flank of the Marylanders - who now have a problem. The Irish are going up the middle with a Gun. The lights take on the woods, as always, and drive out the Rifles who retreat onto the hill behind the woods. The 40th Foot try to force the Pennsylvanians to crumble without any help.  Bringing up the rear are the Grenadiers, who I hope to use in a final attack on the hill. Below, it's about turn 4-5.

Below, Turn 7, American reinforcements enter, putting strong Continental infantry right onto the hill. The Gun is also firing to some effect, but not enough. Unfortunately, the Marylanders flee right into the middle of the hill when the Grenadiers and Irish combine their fire.  The Brit Gun hasn't even been used yet! The Rifles sort themselves out and again oppose the advance of the British lights, who steadily work themselves forward, using the woods as cover.
Unfortunately, the American general goes down while rallying the Rifles. He took too many risks, it seems. His ghost haunts the hill now...

Turn 9. The white Carolinians now prepare to back up the rifles or hold the flank as needed, while the Marylanders reorganize and prepare to replace the Gun atop the hill when it runs out of ammo - only two shots left! The Pennsylvanians are just barely hanging on against the steady advance of the 40th Foot. 
The British have steadily advanced, taking advantage of the disarray of the American center. Space is getting tight, however, and I should've made a few quick measurements of what units fit where - the British gun has no space to deploy effectively, so is shifted to the right, hoping to flank the hill when the Pennsylvanians are driven off. This seems pretty likely as the 40th Foot has steadily out performed them, driving them back a short distance. Still, the gun could already be in use if I had planned better!

Turn 12. The Pennsylvanians fled the field but the Carolinians have arrived and are opposing the 40th Foot. The Rifles are holding off the lights, but probably not for long!  The Gun ran out of ammo and left the hill, so the Marylanders are returning to the fray, albeit a bit the worse for wear. The Germans are holding their own.
Meanwhile, the Brits have made a solid line, with the Highlanders taking on the Continental Germans, the Grenadiers ready to charge up Edgehill, the Irish in a deep formation - column by divisions - so they will fit and fire upon the Rifles in aid of the Lights. The 40th Foot finishes up the battle line, now facing a second, fresh unit of State Line.

All too quickly, a charge from the Irish break the Rifles. The Lights advance into the gap thus created, threatening the Gun and the Carolinians. But the Infantry is the real threat, not a Gun that is out of ammo, so...
...they pour a couple of volleys into the Carolinians open flank!
Turn 13. The Carolinians leave the field, overwhelmed by the combined close-range fire of the Lights and the supporting 40th Foot. The Irish are on the hill along with the Grenadiers. Still, may be possible for the Americans to contest the hill these last couple of turns...?

Below, Turn 15. The Highlanders broke the Germans, the Marylanders are not in good shape, while the Irish and Grenadiers still have some drive left in them.

At battle end, the damaged Marylanders are still contesting the hill!

Whew, that was a tough fight.  It took longer than I thought to get the British into position, altho once they were there it was a steady, successful advance. Their Gun did nothing but run around the board, and I should have left it on the Left to pour cannister fire into the Marylanders and Germans on the hill!  Just goes to show that OHW scenarios are pretty tightly put together and often give a close result if both sides play comparably well.

For the Americans, I made a mistake advancing the Marylanders off the hill. With their shorter range, they should have been in the woods and the rifles on the hill. Only problem is they don't melee well, anytime. The Pennsylvanian State Line are sort of like my Grenadiers - a hard luck unit that always seems to perform poorly. The 40th pretty much kicked them off the board on their own merits. Once the rifles got evicted from the woods they should have formed a continuous line along the hill. Instead, the Brits caught them in the flank and drove them off.

Overall, very happy with how the rules have been going. Scenario #8 has consistently been interesting to playtest, and with just a little variety in force composition, the rules have had plenty of decisions for both sides.  Generally, tactical errors on my part led to the mediocre performance of both sides in this game.

Zeal and Bayonets will need to head out onto the table for more playtesting with others.  On an uplifting note, I managed to reach the author, Matthew H. Spring, through his school!  He was very nice - if busy with the start of term - and graciously gave permission for me to use the title of his book for my rules. It is a quote from a British officer, anyway, but how my rules play is very much inspired by his research and effective presentation.  Extended review is here [CLICK]. Very enjoyable and informative work, can't recommend it enough!