
This is no way for Old Comrades from the Mexican War to meet...
Adler 6mm figs painted by Steve Whitesell [of "Sound Officer's Call" blog fame]
So decided to be super lazy and not move any terrain around today, just play - once again - Scenario #12 "An Unfortunate Oversight" from the One-Hour Wargames book. This time I'd use a shooting period, and try the W:AI ACW rules. You'll note that I've played #12 a number of times in the Feudal period and posted the AARs HERE in my Dark Ages blog, "Spear to the Strife".
I've found it a pretty challenging scenario with a couple of options for each side that definitely make a difference, depending on what the opposition chooses. However, the shooting in the Feudal rules is limited to just a couple of Units and a short range, while the ACW will of course have artillery and all the Units shoot, a significant difference when forcing a river crossing.
I've been meaning to try these W:AI ACW rules for a while as a precursor to trying the "Wargaming 19th Century Europe" book. There are no scenarios in W:AI, the only victory condition listed is to put your opponent down to 25% strength [I prefer the presentation in W19cE which has several scenarios, but that's for another review!]. There are some interesting army lists for all the periods that don't pretend to be completely equal or fair but provide interesting challenges, e.g. the Spanish Napoleonic list, in which case Mr. Thomas suggests that the better player take the Spanish or that players switch sides and play a second time.
So it should be noted that this is just a test of the rules and not a test of the complete ACW package in W:AI, which will have to be playtested next.
So for quick reference, here's what the book scenario looks like:

The Red player is defending the river and has occupied the town, but has overlooked a crossing nearby. Blue is taking advantage of this to cross the river and seize the heights commanding the town and the two crossings - a classic military challenge from the One-Hour Wargames book!
Red must set up all Units within 12" of the town, Blue sets up second and goes first, but can't fire on Turn 1 due to being scattered and looking for the crossing. Victory goes to the side that controls the hill at the end of the battle. Board and initial setup: has the Rebels up top departing the town for the hill and the Union stacked up to cross as quickly as possible.

I've sized the terrain as exactly to the pic as possible, including the river width, altho my hill is twice as deep [12" instead of 6"] which can make a difference if using a military crest rule [allowing the defender to be an additional 3" back to the center crest]. Today I just said that units "uphill" get Line of Sight advantages, the rules have no movement penalty, and no fire or melee effect for hills in the ACW rules.

Confederates: 5 infantry and one Napoleon section.two infantry and the gun face the enemy in case they deploy opposite and begin shooting. The other three infantry are going to occupy the hill. The Confederate plan is to defend the hill with four Units, including one in reserve on the Hill and two up front, then use the gun to weaken attacking infantry or knock out a gun with counter-battery fire. The Infantry in the town will cross the river and advance upon the Union guns, preventing them from supporting the Union attack. As the hill is the victory, not losses, it doesn't matter if this Unit survives, just that it accomplish its mission!

Union has two gun sections, one Napoleon on the right and 3" rifles on the left. the four infantry are stacked up at the crossing. It takes a full turn for a Unit to cross a river in these rules. The Union plan is to advance upon the hill with all four infantry units, weakening the enemy infantry with preparatory fire from the guns to cause that extra Hit for stand losses and therefore retreats off the objective.
I rated all Units Average for simplicity's sake, and gave each side one general [explained below]. A couple of additions I made immediately:
- "Column" Formation. I added this making it cost 50% to get into or out of just like a turn or wheel. It fires at half effect [2 dice] but obviously is easier to maneuver around. It is not really a column so much as a double line, commonly used to maneuver around on the ACW battlefield.
- The General gives a +1 morale benefit if attached; however, if a '1' is rolled using the general, he's wounded and out of action until a 4+ is rolled to replace him. Generals count as lost Units should the scenario result in a debatable outcome.
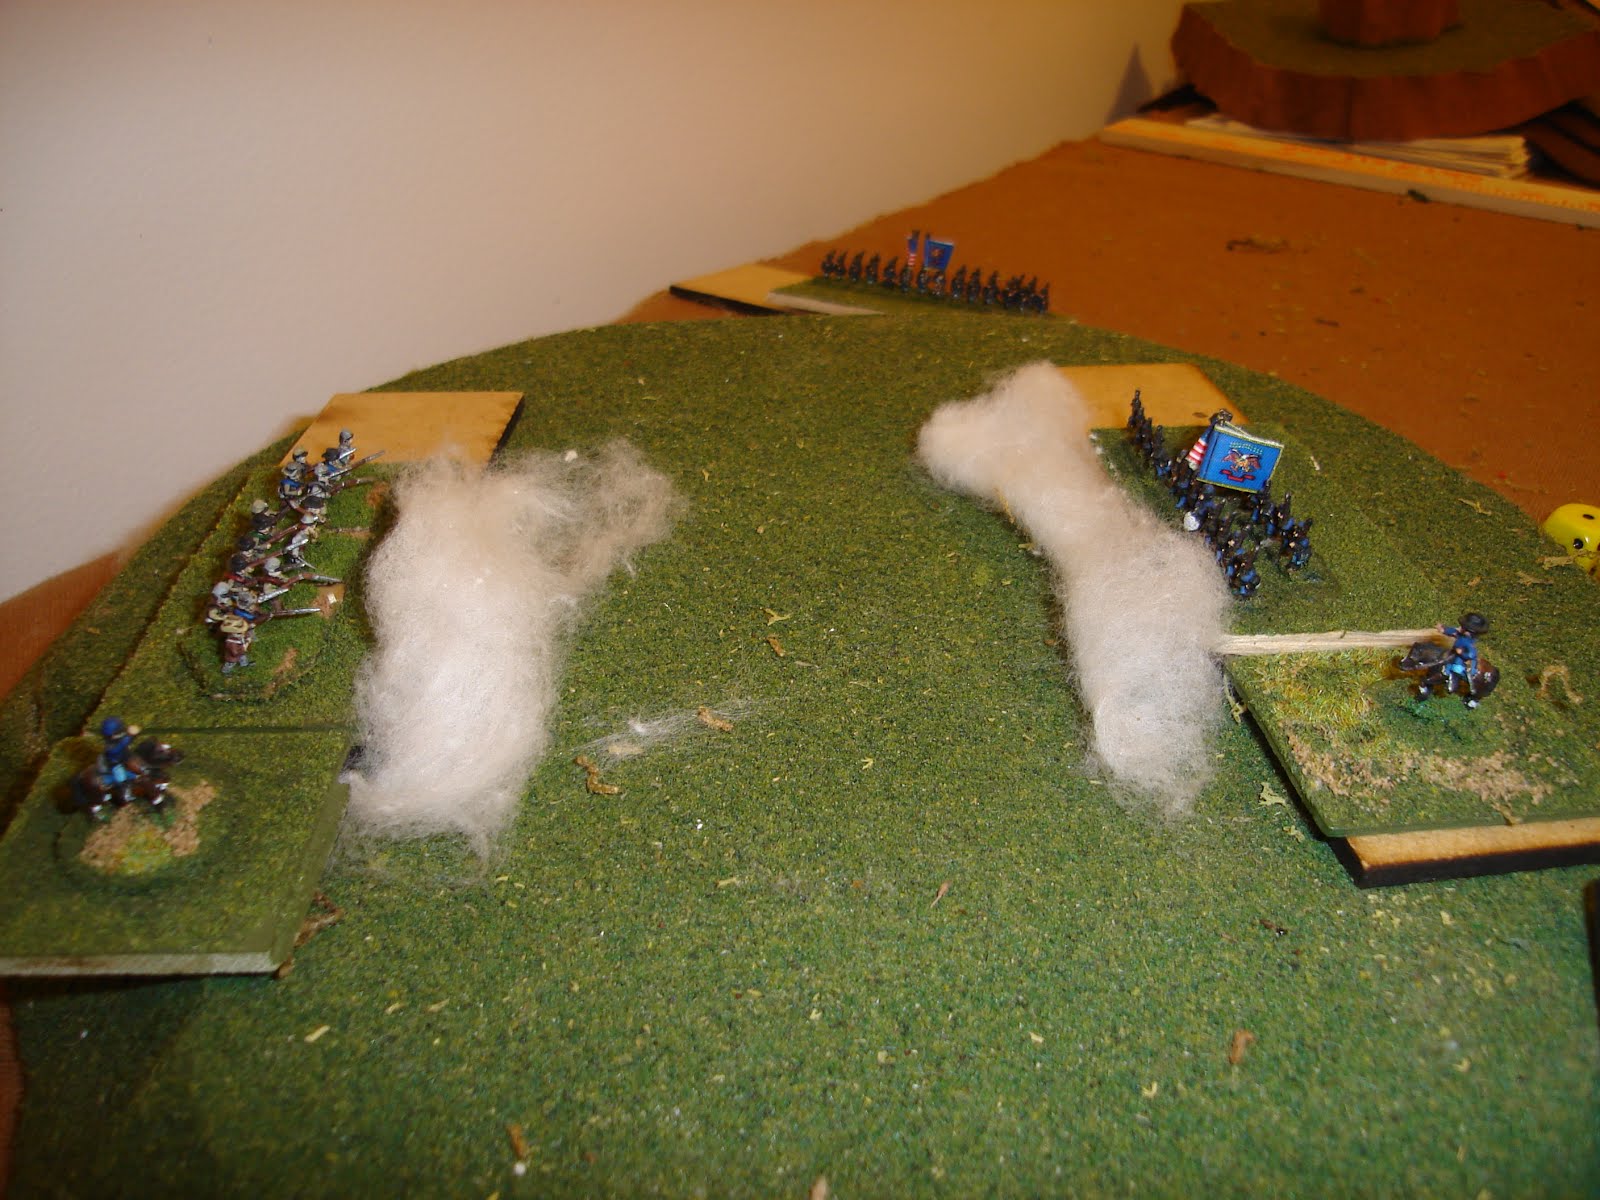
Due to rates of movement, I took pics about every four turns - this game doesn't play as quickly as "One-Hour Wargames". Below is the situation and exciting events at Turn 4: The Rebels are occupying the hill with their two lead Infantry Units while one regiment crosses the river at the bridge to distract the Union guns. The Union is steadily advancing up the right, being careful not to obscure their guns who have rolled well and pounded the central Rebel Infantry, causing it to retreat 8cm [to fit into the gap it has narrowed to a "column" formation, well, blob really]. As full movement is only 8cm [3 inches] and turns or wheels cost 50%, movement is pretty leisurely. I've already realized that the 15 turn limit on a OHW scenario is going to have to be doubled to 30 turns!

Yeah, how about those Union guns! Not only have they inflicted 5 Hits in four turns, but the first morale roll of the game resulted in a '1', killing the Rebel general who decided to give them a bonus to rally on their Turn 4! What are the chances of that?

Well, apparently they are VERY high chances, because the Rebs manage to replace him on a 4+ in their Turn 5 Rally Phase, General New then goes to rally the retreating Rebs and rolls...a 1! Two dead Reb generals! And the Union Guns inflicted two more Hits on THEIR Turn 5, putting the Rebel regiment at almost 50%. A little luck would be appreciated here...

Turn 8 below. The Yanks continues their slow but steady advance, intending to form a firing line that will engage the Confederates on the hill at some advantage and with gun support. The Rebels have fallen back under punishing artillery fire, retreating all Infantry out of the 48cm range. The lone Rebel infantry that is going to distract the guns now realizes the importance of its mission and thirsts for blood - Death or glory! The Rebel Napoleons haven't been idle even if they've not been as successful. They managed a Hit on one Bluebelly and then switched to counter-battery fire on the annoying 3" rifle section that gets to re-roll misses. Their thirst for vengeance is clear, and they inflict two hits, putting the Gun section at 50% despite its 4+ saving roll.

Turn 12 below. the Union plan continues to unfoled, and the lead infantry regiments enter the Rebel infantry range while their guns pulled out of range of the Rebel gun and commenced pounding the advancing Reb Infantry regiment rather than face shooting or a charge from it. However, they've inflicted two Hits and are holding their own. It'll be interesting to see how the combination of infantry v. guns plays out as guns do not get to rally [being only one base large] and do not take morale checks, while infantry have to take morale checks, retreat if they fail, but get to make rally attempts even under artillery fire.

And on Turn 13 the advancing Rebel loses a stand, fails on a '2' and retreats 8cm. Still, it is keeping the guns busy while losing stands it can always attempt to rally back. A good plan!

Turn 14 also has some excitement as the advancing Bluebellies test the fire rules! Reb shooting results in the top Union regiment taking a stand loss and retreating 8cm. The second Union regiment down takes 9 Hits total, causing two morale checks, both of which are passed by some very determined Union soldiers - they must be Abolitionists of some sort...? Part of the problem was that the retreat of the North Union Unit at its first stand loss left this Unit exposed to shooting from two Confederate Infantry Units, who also rolled well.

Turn 16. I found it necessary to start marking units. a black triangle shows they moved and a puff that they fired [of course] while rallying is denoted by a cog with the dice rolled upon it [usually]. This view from the Rebel lines shows the North Union Units to the left - the left-most rallied back its stand loss and advanced back into 16cm shooting range, while the second took a third stand loss, failed, and now rallied back one stand with the '5'.
Meanwhile, the Rebs are filling a hole in the middle of their line with the Unit that took a pounding from Union guns and was in reserve, while the other retreated and now tries to rally back a stand [it will still have three Hits, as Hits cannot be rallied only stand losses]. It should be noted that the right-most Reb is now facing two Union regiments with just the one Napoleon section supporting, who promptly begins a missing streak that will last nearly the entire game! Who provided this ammunition, anyway - Philadelphia Quakers???

I think this pic gives a good idea of the back-and-forth that the morale rules provide.
More Turn 16 below. The Rebels continue their cunning plan to harass the Union battery. All they need is one unsaved Hit and the 3" Rifles will be knocked out of the game...will they?

Turn 17 results in something of a crisis for the Rebels - two center Units retreat under fire.

Turn 20 has little to no change with the Infantry v. Gun situation. The Rebels take Hits, lose stands, retreat, rally, advance again, but haven't managed to inflict a hit. Such is life.

However, Turn 20 at the main battle on the hill has resulted in some real difficulties for the Confederates. Union Infantry fire trashed the Confederate Napoleon section which rolled poorly for saves and decided to save their guns for another day [destroyed, basically]. The Rebs also struggle to present a solid firing line to the four Union regiments. One was forced way back to rally [seemed a good idea at the time], two retreated and turned around [for want of explanation in the rules, I decided that a retreating Unit finished its retreat facing the direction of the retreat, i.e. away from the enemy. This resulted in a Unit having to decide between turning around - moving - or rallying but not facing the enemy - makes sense to me...] while the third is advancing with no stand loss but three hits [so almost certainly an immediate morale check once within Union range]. Very realistic feel from what I've read in memoirs, Nosworthy and Griffith.

Turn 21 results in a valiant stand by the left-most Confederate Infantry Unit.

While Turn 26 sees the Rebel Infantry finally inflicting two hits on the Union 3" Rifle section, which of course passes both - and survives!

Turn 28 results in another Reb Infantry getting wiped out, but off-camera the 3" guns are shot up by the Rebels - finally!

And Turn 30 looks a bit like Little Big Horn instead of Little Round Top! With this lopsided a result, I can't give the Confederates anything but a marginal loss - they may still be on the hill but their force has been defeated. If this was a campaign game, we'd have to hope that the time gained from the delaying action justified the losses of Rebel infantry and the crossings.

Whew, that took a lot longer than I thought it would.
Initial reactions.
- Dang, what a fun game!
- But it took longer than I thought, due to slow movement rates and the ability to rally back ALL one's losses. Possible remedies: double movement rates outside of 16cm of the enemy, make rallying harder or that one cannot rally back all stands - just stands 2 and 3, so once you've lost your edge, it stays lost! Also, should one be able to rally under cannon fire? Certainly not Canister fire [reflected in the game as a 12cm close range for guns that gives Napoleons a second shooting dice].
- The morale rules quickly and simply reflect a certain point of view of the historical reality that NT has - which is that these amateur armies and their independently minded American soldiers are quick to fall back and quick ro rally and try again. They rally one point better than they check for stand loss.
- I thought about a couple of charges, but, I was rarely within 8cm. Also, the issue was always so in doubt as to passing the check and if it would benefit, I decided to stick with firing, There's no penalty to attempt the 5+ morale check for Average Units and fail. However, the Defender gets a shot if you succeed, so in essence a bonus shot against you, in your turn, then you melee, and take more Hits, and then the loser automatically retreats.
- Time commitment: this game takes about twice as long as a OHW game, say two hours instead of one if players know the rules.
- Tactics. There's definitely a lot more going on here than meets the eye. The mechanics are very simple, quite traditional. However, what the mechanics MEAN in terms of tactics will require an in-depth analysis in another post, I'm afraid - I'm quite worn out with thinking and typing!
- It should be noted that I did NOT use the provided army lists or simple terrain system, so this has really been a test of the basic mechanics, not the entire game provided.
This was an enjoyable game that required quite a bit of familiarizing and dealing with situations not explained in the rules. As is often the case with NT rules, certain essential mechanics are NOT provided - much as I like his style, I consider them culpable omissions not just small oversights, and I think they require an experienced gamer to figure out. These I jotted down just while playing this game:
- There are no formations except line, no shooting mods [which may be fine], no target priority rules, very little terrain rules,
- No fire arc [I used 45 degrees], no measurement points for fire or melee contact [I used the center front for firing and, for targeting, the center of any side in Line of Sight],
- No Line of Sight rules [not an issue as the town was never contested, I'd be inclined to go about 4cm across or within blocking terrain],
- No indication of the gap needed through which to fire [I used > 1/2 frontage],
- No interpenetration rules [I said you can't],
- It doesn't say in which direction you face at the end of a retreat [I said away from the enemy, i.e. in the direction you retreated],
- How many Units can charge one defender?
Some of these questions MAY be answerable by looking at the Napoleonics rules. Some I like the way the Napoleonics rules handles them and may steal them [like the General rules]. It is pretty clear that these fine rules are an "80% there" set for me and will need to be typed into WORD and then have clarifications noted in color, and changes in another color.
Still, I feel they are worth it, they are much better than I thought just from reading them and I'm starting to realize how brilliant the tactical effects of the rules are as I jot down some notes - hmm...
Very glad to see you break out the ACW rules and take them for a test spin. I like how you've dissected them and analyzed them from the perspective of OHW and you can really see where the differences are.
ReplyDeleteThe rules in W:AI really capture the texture and nuances of what I'm personally looking for in a rules set. Plus I like rolling a few D6...
I'm going to play them very soon I think. We must get a game on the books soon. I'll also be playing Neil's W:AI WW2 rules as well soon.
I'll link your latest AAR for the WW2 rules. Definitely let's try these out, I've been making an effort to finish interpreting them. My GUESS is that W:AI [2005], AMW [2007], and Napoleonic Wargaming [2009] are all from the same theory / writing style, timeframe. The excellent Wargaming 19th C. Europe book is from 2012 and OHW is 2014, so I think there's some progression of mechanics as well as progression of more explicit rules.
DeleteI'm trying to discern which of the W19C apply, and I merged them last night, altho some are not a right/wrong but a "how do you prefer it" sort of question. More on that later.
I think most people change the rally rules. No other rules in any of his other books allow you to rally the losses like that. Strange that he chose something so unbalanced for the ACW.
ReplyDeleteHey Dale,
DeleteGood to see you, my pals have pointed your blogging out and it's good stuff.
I think the runaway and rally is sound history, for sure. Reading the detailed regimental and brigade accounts shows that units would dash 100-200 yards back like lightening if they felt they were needlessly exposed, or if surprised / panicked. discussed all the time. Casualties might be very light if so. So I don't have a problem with Mr. Thomas' take on ACW.
However, I do believe that athletically, one does lose the edge one starts a day with. Sound night's sleep, hot breakfast [second breakfasts?], crisp day, all make for a good start. But some shooting and running around does take the edge off.
My next outing is going to have a rule that says if you lose 2-3 Hits [out of the 4] you cannot rally off that one last hit. So if pressed to exertion, your "edge" is lost for the day.
It is however still possible to take a single hit, retreat, advance, take a hit, retreat, advance, indefinitely. I'm OK with that since my scenarios always have a turn limit. The OHW are 15 turns. I did another play-through yesterday and on turn 17 the decisive result happened.
In any event, have finished putting the rules into WORD RAW, which I've shared with Steve W. at "Sound Officer's Call" and we'll playtest. Am now working on my modifications in WORD, also, some of which are clarified by the lovely W19CE book.
Cheers! Alex