How Men of Quality Resolve Differences

How Men of Quality Resolve Differences
Pudel and Peper attacks - an ugly but inevitable part of any 17th C. British Civil War, "Oh! The Shame of it All!"

Tuesday, June 27, 2023

Mustafa's "Blucher" - All the Rage!

And by all accounts, he was a pretty ANGRY guy!

Well, after some back'n forth, "Sound Officer's Call" Steve agreed to run me through a game of Blucher.  I'd read the rules and reviewed the QRS, and found it to be the same sort of tightly written no b------t set of rules as "Lasalle".  Unsurprising, since Lasalle is the Unit=Battalion version of the same rules.  Blucher is a Unit=Brigade.

Overall, the rules are relatively simple, especially in the Basic version.  You play a corps commander, and are mainly concerned with positioning your Units [Infantry Brigades, Cavalry Regiments / Brigades, Artillery Battalions / Grand Batteries] and their Fatigue level.  Units have combat points which directly correlate to shooting and close combat dice. Typically, it is 4-5 Elan [Militia, Conscripts] to 7-8 Elan [Guard], with most units being around 6-7. When a Unit "hits" you in shooting or close combat, you lose a point of Elan. When your Elan is gone, the Unit is removed.  

Artillery works a bit different, it has several shooting dice, usually starting at 5, and decreasing by 1 or 2 until it gets to '2', after which it "Retires" from the field due to low ammo.  

Without going into details of the IP, every time you Fire with a full strength Unit you've a pretty good chance of putting one Fatigue on it, until you get low in Elan.  Close combat is more certain - the winner gets 1 Fatigue and the Loser gets 2!  This metric means that even winning Units are only good for a couple of Close Combats, after which they are weak enough to be easy prey for fresh reinforcements [hmm, sounding a lot like history here...].

While it read pretty cleanly, the best way to get aquainted is to play!

Steve threw down Quatre Bras, more or less, which was very suitable since we were just two days after the anniversary.  Map from [HERE].
A Horde of Rampaging French Grognards is attacking a mixed British - Dutch - German force near a strategic crossroads.  Can the British hold the French off long enough for a strategic win elsewhere??  Let's see!

Below, view from the British lines. 
Hordes of the French Things in 10mm advance upon the hapless Dutch-Belgian militia brigade, thinly scattered like a speedbump across their front.
Above, a few Nassauers and such will attempt to hold Bossu Wood from the Godless Revolutionary Savages who have spilled blood from Portugal to Moscow! [can you tell which side I'm playing?].

First Momentum roll of the game, I almost max out the possibilities.  I enjoy playing a psychological game against the French Commander, grimacing and trying to be nonchalant.  Will the Allied Psyops plan work?  We'll see!

"Seems they have quite the numbers today, eh" says Wellington calmly. "But mark my words, they will come on the same old way."

Below top, two Dutch militia brigades hold Gemioncourt [in game terms a wood and a town]. Below bottom, the British Guards and friends advance to their aid.
French to the front of them, French to the left of them, yet the Militia boldly stand.
French cavalry brigade outflanks the woods as infantry pins the front.
The Dutch militia go Prepared.  Turns out this is not a help at all unless there are cavalry about... I guess I'd prefer if it was just called "Square".

Below, Wellington gets his spyglass on the Horde bent on destroying King, Country and all that is Decent and Good in European Civilization. Or something to that effect.
Meanwhile, behind him in Bossu Wood, the only consolation these two Units have is that they are not sitting on the victory condition.

Turn 2 Momentum Roll for the French - I try not to jump up and down with glee...
Have to say that I find it odd to roll for my opponent's Momentum.  I would rather prefer to let him do it, without looking, and then just cover it up.  The Momentum points are spent to activate Commands and Units.  I found that one rarely ran low on them, but it occasionally did happen.

The French quickly force the militia out of the woods, and the town is next. This heavily outnumbered command is going to retreat, the only question is "when?".
French cavalry flanking Gemioncourt. The militia have 3/5 and 4/5 Fatigue. French infantry and cavalry finish off the Dutch.  "The Horror!  The Horror!"
Detmers brigade now stands along in the farm itself.
Then they two are swamped by the rising tide of Blue!
and the town stands empty and forlorn...
Meanwhile, the French have flowed past Gemioncourt entirely. The French Dragoons try to overrun the Guns, but tie and are repulsed!
"Well done," says Wellington.  "Of course, we expect that from British guns."
The foot artillery continue to support the Bossu Wood. But the Allied Cavalry has now made it up to support their left, which they succeed in doing.
Above, Allied light cavalry drive the French horse from the field. No Risk pieces were harmed in the making of this charge...

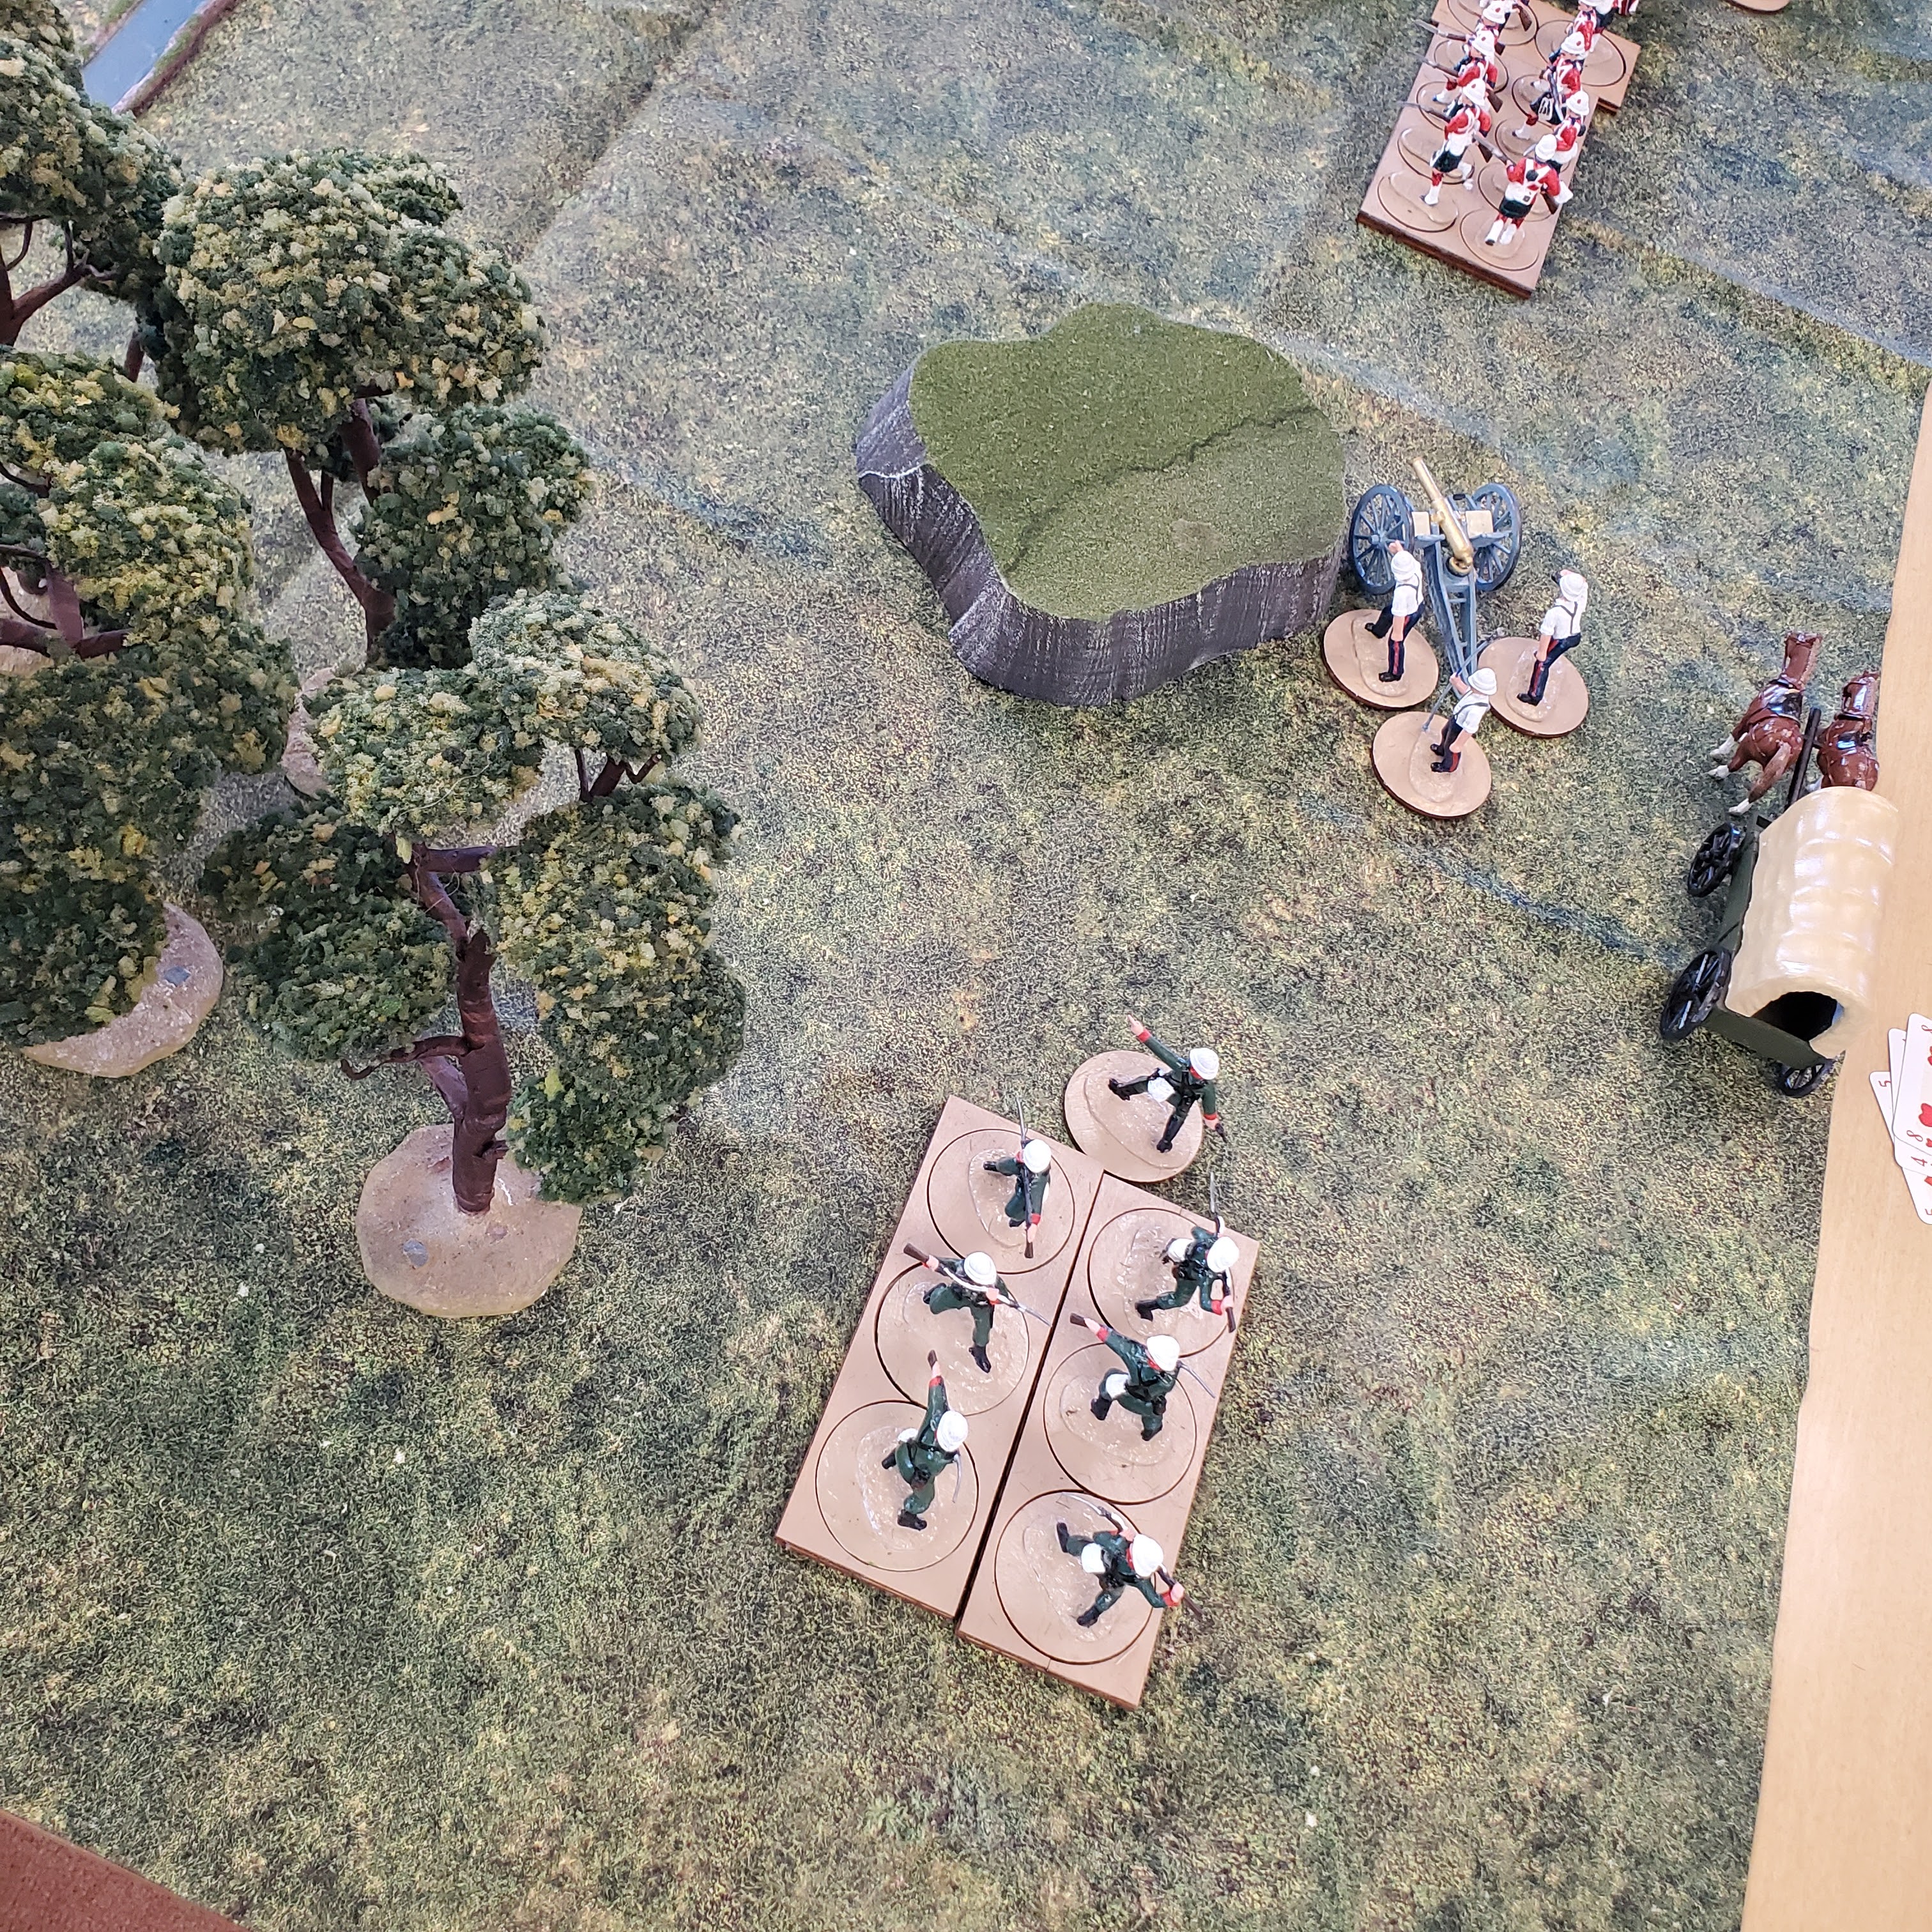
With some optimism, the French Quiot brigade charges the British guns.
And they succeed in taking the guns.

Meanwhile, near Quatre Bras itself, a wild cavalry melee is brewing.
With nothing more than their Powder Blue coats to protect them, the Lowlanders brace for another onslaught, and the entire French cavalry brigade charges.
They destroy one light cavalry regiment, but the Powder Blues stick around despite being out-weighed if not out-apparelled in cavalry.

Some issues with Unit placement are occurring as the center gets crowded and our lack of familiarity with actually moving the Units becomes a problem.
But, Blucher is a pretty forgiving system.  It is not driven by mechanics, but rather more by the decisions of the players.  If both players agree and get the effect they want, then many of the mechanics are easy to work out.

Over on the left, the British elite infantry are holding a hedge line and the road against the somewhat Fatigued French cavalry.

Farther left, Guards and Guns are damaging some French Units.
Above, the British Guards roll LOTS of 6's and easily hold off the French line.
Below, the British guns, are munched by a weak French cavalry regiment.

"I say, there seems to be a problem with our guns today," observes Wellington.

French are now attacking Quatre Bras as the second wave of Allied reinforcements arrives. They are fresh but militia, yet they hold the initial advance quite solidly, shooting the French to pieces from their barricades!
The French brigade evaporates - but there are more coming!

At this point, it seemed like the French wouldn't be able to take Quatre Bras. Overall, it seemed like a repeat of the historical outcome - the British hold the field but are unable to reinforce Blucher.

However, turns out we both forgot about the French guard, which was inadvertently left behind first due to a lack of Momentum Points, then because in discussing the rules and various other things, and of course figuring out various points in the rules, we just forgot about them.

My thought is that the French, with the Guard, would have taken and held the town, but there would have been some problems with their flanks due to their by-passing of the Bossu Wood.

Overall, this was a great run-thru of the rules. 

Forgetting the actual results, and some of the more unusual dice rolls, the game played quite smoothly.  Both of us were more concerned with where to put our Units and their Elan / Fatigue, than with lots of small persnickety rules.  You really do feel like a corps commander, and that you are making decisions at that higher level instead of worrying about if the Royal West Caldonians have got their tot of rum for breakfast and stocked up on dry musket rounds.

Most of the mechanics will be immediately familiar to any experienced wargamer.  Momentum is closely related to the command pips in the DBx family of rules.  Both the firing and close combat rules are entirely familiar.  However, it is the BALANCE of rules, and what is NOT put into Blucher that really makes it shine.  It is encumbered with neither novelty nor a multitude of rule exceptions, and this makes it an exceptional rule set.

I will definitely look forward to trying these rules some more, and borrowed Steve's unit cards to do just that!

Sunday, April 30, 2023

A Gentleman's War: Gone to Tsingtau!

"Very Pretty, Herr Waldeck...But Can they Fight??"


Last month, got together with my favorite most available retired gamer dude, Reg, and put his 25mm WWI Far East Germans and Japanese on the table. This conflict largely revolved around the Japanese helping the Allied war effort by reducing the German far east possession of Tsingtao [not without some self-interest being involved, of course].  Don't believe that the Germans and Japanese fought each other?  The story is here: CLICK!

Rules used were "A Gentleman's War" previously demonstrated with Reg's Blue v. Red armies, in the true Old School gaming tradition [CLICK] for which the rules are designed.

German commander, suitably dashing and properly attired - 
just needs a cigarette hold [a loooong cigarette holder] and perhaps a Luger?
 
First German troop unit - 12 riflemen w' NCO and officer

Ten sailors with officer and NCO

12 more rifles with officer and NCO

Mounted infantry - 6 Mounted / Dismounted, 6 on foot.

Two maxims, and some sort of pom-pom gun on loan from the navy.

German officers hold a brief staff huddle as they regard the advancing Japanese column. Col Fritz Lieber boldly announced "We will hold the village and interdict the road - failure is not an option or Tsingtao falls!"


Meanwhile, advancing down the road is Col. Kurasawa, who has vowed not to sheath his sword until it has drawn blood, and his ray-bans have seen the heels of the round-eyed imperialists!
"You are surprise I speak you language - but I was educated at your UCRA!"

Honorable mounted Samurai?

The cavalry is on the center right, with rifle squad closely supporting.  Beyond is a gun, a rifle squad with Maxim, another squad, and a large reserve of two rifle squads and another maxim.

Lovely figs and characterful paint jobs make for a pleasurable table display!
Mat is Russian, the trees are Chinese doller-store stuff so it should all fit together well visually!

The Japanese reserve will enter next turn, supporting the main effort. Two squads of rifles are durable and have some punch shooting or in close combat.

The Hold Cards are drawn, and significantly favor the attacking Japanese - clearly, they did their scouting well and have informers in the village!
But, at least the doughty Germans have one Face Card up their sleeve...

Japanese make a strong forward attack against the village.  It is held my Naval squads with support. They hold strong so the Japanese close the range to turn up the heat, with a gun and a maxim firing at point blank range - that will ventilate those stifling huts nicely!

Honorable Regitori wisely dismounts his cavalry after being ambushed by a wily German Maxim from the woods.

Overwhelming force is brought to bear against the scattered Germans. Being separated in the houses proved a big disadvantage, as the Germans had to wait for cards to fire, but the united Japanese advance was firing altogether, and cycling faster.  
The Germans react by moving up the cavalry,  and a maxim on their right flank.

Under heavy pressure, German squad and maxim "advance to the rear" to regroup!

Japanese firepower clears the near houses entirely. Dead sailors litter the streets!
The German pom-pom advances in support, only to be met by a hail of lead and lose two crew.

With several units on their last couple of figs, and fleeing, the Germans will not be able to resist the Japanese drive down the road. The flanks were a bit too strong and the center a bit too weak.  

This battle reminded me that it is VERY important to organize a brigade firing line around The General - this way he can organize concentrated firepower of 4 units, which shortens the cycle and allows them to fire more often.  As the Germans took losses, they eventually fled and the scattered units also bog down the card cycle, slowing German reactions.

Another fun and characterful fight!  

As previously stated, the card sequence is the most ingenious part of the game.  It is easy to use, rewards skillful play, and yet gives a very realistic feel without a lot of complicated rules that in other sets fill several pages.

Only thing we thought should be changed is that the weapons should be selected to be a bit more lethal, which would speed the game up without changing any of the important aspects of tactical play.  Perhaps adding some more range as well...

Still, there was a price to pay, and all this violence was for a product easily obtainable today...


I will look forward to getting AGW out for my Mexican Civil War units.  I wonder how they would do with Spanish Civil War?  Hmmmm.....

Thursday, March 9, 2023

A Gentleman's War: Gone to Fight the Blues

Gen. Reginald von Frankenfurter supervises laying of his Krupp gun. 
The laying of the gunners must be settled after the battle...

It's been a while since I dusted off and played that military masterpiece by Howard Whitehouse "A Gentleman's War" [ably assisted by Mr. Daniel Foley, Zoltan Korda, C. Aubrey Smith and June Duprez, oh wait...], so it was with zero hesitation that I invited Reg and his force of nicely shiny Blues and Reds [courtesy of Armies in Plastic] out to a game lunch and Pulp Action Library's biggest hit since TV went colorized:


Below, the Venerable General of a thousand tabletop battles and decorations and awards too numerous to count, Gen Reg von Frankenfurter, collects his thoughts before unleashing h**l against his opponent, Gen. Alexander Crumpets, and his Reds.  Units are 7-10 figs in size, 7 each side, composed of four Infantry, one light, one light gun and one cavalry each.
As this was a first game for Blue, we decided on the simplest scenario "Open Battle" which ends when either side has driven half the opposition from the field, preferably before dinner.

Let's see what happened!

To Crumpet's right, Blues began with no unit in the house [hmmm....] a light cavalry and two Infantry towards the center.
The small rise counts as a hill.  The stream counts as rough going as the Soldiers need to polish their shoes after crossing it.

The center is held by that marvelous machine of mayhem, a Krupp light gun with two Infantry to left of it, being led by a Jager [Light] unit that plans to sieze the woods.  The wagon holds comestibles, combustibles, and "medicinal schnapps", so must be protected!

General von Frankenfurter strikes a pose next to his loyal standard bearer, 
Feldwebelanwärter Augustus von Frankfurter, his nephew. 
"Feuer! Feuer! Entfesseln Sie die Holle!" he cries, brandishing his Walther PPK.  
Hmmm... this all seems somewhat familiar...need more woods perhaps?

On the right, Gen Alexander Crumpet successfully masses his strength: four Infantry units and one Light Cavalry. He himself stands behind this key strike force, with his trusty piper, Staff Sergeant Archibald MacGillivray, pipe champion of Clan Chattham [CLICK] and slayer of a thousand eardrums. Holding his trusty revolver by his side, he shouts "Touch not this Cat but with a glove ye Teutonic Rabble!"

Towards the center, that marvelous machine of mayhem known in Blighty as the Whitworth light field gun shelters in defilade, prepared to support the Main Effort to its right.  Behind, the invaluable wagon holds comestibles, combustibles, and "medicinal brandy", not to mention Stumpets and Crumpets, so must be protected!

The field in its entirety.  Most likely Belgium, famous for its central position on the Continent, not to mention 457 kinds of beer and mussels - something to fight for!

View from the other side - Leftenant Abernathy is taking images from hislighter-than-air balloon it seems...Hold cards are three numbers apiece, nothing exciting.

First card cycles. The Prussians probe Red right, which is countered by a rapid advance of the East Stampeding Fusiliers [you can see they are running] towards the house.

Fire is exchanged, with Blue coming off the worst.

With crossfire from the Whitworth and a weak force ahead, Red continues to reinforce the advance with the other company of Fusiliers and the Royal Highland Islays.  "Peat and More Peat!" they shout their battle-cry of victory.
Meanwhile, the Dull Rifles company keeps the jagers busy in the woods.

After a second cycle shortened by the second Joker, a new draw of Hold Cards is made - it seems Mars is favoring Blue somewhat, fickle god he is.

A frontal cavalry charge against the Fusiliers left company atop the rise is seen off with half casualties as they Run Away to fight another day. The probing company of Blue Infantry did a Fall Back and are near 50%.  Red senses victory!

Well into his 3rd card cycle, Gen Crumpet is poised to seize the building as a base of fire to continue the Big Push into the Blue left. Granted, one company of the Fusiliers is at 50%, but they are Brave Lads and Carry On.
As the sun begins westering [a late brunch was had by all] Gen Crumpet unleashes the "Lucky 13th" Kings Own Nobby-knackered Horse upon the rear of the fleeing Lancers!

Unfortunately, they were able to turn around and order themselves quickly. Altho they took the charge at the halt, outnumbered, their pig-stickers apparently made up for it and they were able to drive off the Lucky 13th, Disordered and with quite some losses. This set back was somewhat compensated for by the Fusiliers seizure of the house, which has the Blue left somewhat Flummuxed...or was that Confounded?

Unfortunately, Major Haberdasher on the left has found himself being steadily forced back by the slow but resolute advance of the Prussian right. His Dullard Rifles fled the woods and then the field, allowing the Jagers to seize the wood.
Meanwhile, the Prussian left holds grimly to the ground upon which they stand, despite numerous morale checks caused by significant losses: the cavalry and an infantry at 50%, the other infantry at 33%.

The Islays hold the center, but the Blues have ammassed a Brigade of shooting and a short card cycle, while the one Fusilier company and the Lucky 13th are reduced to a single figure apiece, as is the Whitworth.

With four of his units destroyed, fled or reduced to a figure and not long for the fight, Gen Crumpet graciously concedes victory and invites Gen Frankenfurter to Tea and Strumpets as any Good Gentleman should!

Between lack of urgency, checking the rules and plenty of conversation, the time was coming to a close and the British were getting the worst of it by the end.

Despite a Plan clever enough to be thought of by a Fox that read Clever at Cambridge, poor morale rolls halted the British advance on the right. This was compounded by the British failure to organize a Brigade firing line quickly enough to handle the firepower of the Blue Infantry and Krupp gun.

Most interesting about the game was the card-driven sequence, which admirably kept the game interesting but rewarded thoughtful play.  It is undoubtedly the most unusual and well-developed aspect of these rules, turning it from "just another colorful and fun set of old-school rules" into A Thinking Gentleman's War that is rewarding to get acquainted with and pull out regularly.

As previously commented upon in my Franco-Prussian playtest, the card sequence admirably handles the friction of battle by turning cards from a single deck, sequentially, allowing one Unit to activate on a number and up to four units to "brigade" and activate on a face card - but they all must do the same thing. Generals can have a bit impact by making it easier to Brigade, but you can't activate a force again until your card sequence ends with every unit having activated.  

Thus, it is smart to Brigade as often as possible, perhaps on two "Wings" of a small force, one moving, the other firing. However, when units fail morale, they Run Away and break up the Brigade.  All of this takes care of generalship and tactics quite admirably [with a bunch of other little twists I shan't reveal" making the card sequence worth the price of the rules alone, IMHO.  It would work with most rules and fighting mechanics.

We both enjoyed ourselves, and plan to play "A Gentleman's War" again soon, perhaps with another set of Reg's figures, 28mm Germans and Japanese from 1915, which sound exotic and interesting to me!

The 54's were very much in the spirit of the game and fun to look at. 40s and 28s would also be enjoyable and leave more space on the 6x4 table for bigger units. As the units were identical on both sides, this didn't matter but Medium Armies of 10--13 Units would definitely need an 8' table I'd say.

Until next time, watch your flanks and keep your sherry dry!