

...probably induces PTSD in gamers all over the Anglo-American world.
One-Hour Wargames Scenario #8 is one of the most-played scenarios of the book in my neck of the woods - geographic or electronic woods. It has that right balance of being easy to set up, tactically demanding and somehow different almost every time as the scenarios decision matrix is large. In other words, just the choices about set-up and reinforcements between the two forces results in several dozen possibilities. Throw in the decisions of where to send the Units once on the table and the two sides interactions and I can't do the math anymore!
There are a couple of generally good ideas for the defender and the attacker. One being to put a Unit of skirmishers on the hill initially and then occupy the woods at the bottom of the hill. If this is not done, the attacker should immediately seize the woods with their own. Cavalry should probably be in the second wave so that forces are entering combat simultaneously. But then again, these aren't always the case! Nice job, Mr. Thomas.
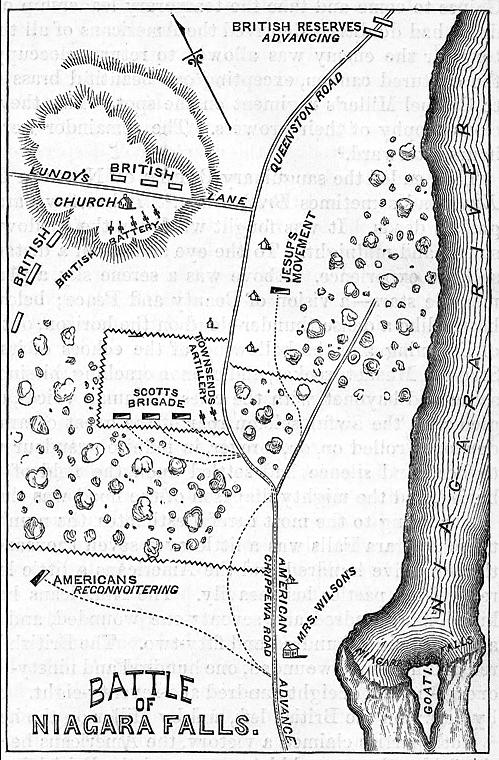
So it was simply impossible not to visit the REAL Scenario #8 when my family made a recent trip to Niagara Falls. The battle is based upon one of the more ferocious fights of the war of 1812, Lundy's Lane, aka the Battle of Niagara. Today, the battlefield is a relatively small area that has been preserved mostly due to the presence of a church and cemetary that anchors the highest spot on the hill. In terms of the above map, the church would be located above the woods towards the East side of the hill.
It is a bit unclear how the real battle was fought in relation to the OHW map as Drummond Presbyterian Church and the sunken "Lundy's Lane" are not in scenario #8. The Queenston Rd. pictured below seems to be in the correct place in above scenario diagram - East of the hill. I will therefore refer between the map and photos with the understanding that NT's orientation of the battle across the ridge / hill matches the above scenario diagram. This places the scenario woods [not shown in below drawing] just south of the battery, and the church in the center of the hill with Lundy's Lane traversing the length of the hill before hitting Queenston Rd. perpendicular to it.
https://www.battlefields.org/learn/maps/battle-lundys-lane
If one wanted to have the scenario be a bit more historical, one might put the sunken lane in across the hill and the church in the center. Given the scale of the NT rules / scenario, it may be easiest to just say that the hill top gives a 1/2 Hits terrain advantage from any angle.
Should you be as fortunate as I to make the trip, the battlefield is easy to find there being a arch over Lundy's Lane itself [second pic below] but the museum and parking are not. Confusingly, there is a church across Lundy's Lane [North and a bit East of the Drummond Presbyterian] that looks like it may be the museum. We actually parked there thinking it was a combination chapel and museum [not uncommon]. In any event, check the day / times it is open and visit the small museum at the hill's crest just North and West of the arch, then head over to the much larger museum which is several blocks away.
View just inside the cemetery entrance at the top of the hill. Lundy's Ln to the right. Hard to tell, but Mr. Winkie is wielding his flintlock musket and ready to take the battery from the flank despite years of relative peace between our two nations!

Same view, just a bit farther in at the top of the stairs where Mr. Winkie was standing. Lundy's Lane runs just to the right and the arch crosses the road [so the view is West, with the battery to the left and the infantry unit rectangles would be across Lundy's Lane to the right]. Straight ahead is the Presbyterian church that was a meeting house of some sort at the time of the battle, and which is at the highest point of the hill. Far to the left would be the starting point of Scott's brigade, advancing towards where I'm standing.

To left, dominating the center of the cemetary, is a lovely copper beech.

Straight along, top of hill just before the Drummond Presbyterian Church. Fine statue of the British commander, Gen. Gordon Drummond. I assume the church was renamed for him.

As all is well among the cousins, and has been for quite some time. So, there are several very tactfully phrased monuments for American and British casualties, all remembering the heroism each displayed in the battle and the ongoing virtues of the present peace.

Mr. Winkie gets to have a solemn moment with dad for the fallen US Soldiers.
Couldn't resist a pic of this plaque for the 5th U.S. Infantry explaining their motto.

This plaque by the VFW - placed at the 150th anniversary of the battle.

Unfortunately, there are commercial and residential areas surrounding the battlefield, so this particular view is East to West, towards the left flank of the British where their artillery battery was placed and later flanked and taken by the U.S. infantry at some cost [note the "I'll Try" motto was due to the fact that few infantry like to assault artillery emplaced uphill of them]. So, on the wargame scenario diagram, the woods would be to the left and the Queenston Rd. behind, with the US forced initial entry point well off to the left.

Just off camera to the right is a motel and parking lot, and just past that Lundy's Lane.
In this view, Mr. Winkie is single-handedly assaulting the hill. The 5th would be proud!

Below, illustration of the 5th's assault on the British artillery.I believe it occurred far right to near left - the church and hill are behind me in this perspective. To the left is Lundy's Ln.

This view is up the North [back] side of the hill. There was fighting here also, I think left to right, not straight up it [which would've been quite the climb]. In the far distance, between the trees, is the bell tower of Drumond Pres. Closer there is more of the battlefield park, and Lundy's Ln is running left/right in front of the tower at the top of the hill.

Same view, much closer at the top. The arch is ahead just to left and the church is direct ahead. The plaques explain more about the battle. To the right is the museum.

Reverse view down the North side - the trees and terrain are pretty close here.

Final views. Church to right, four engraved stone "murals" directly ahead with the cemetary above, and the reddish copper beech tree here appears a dark red to left of the flag.

Brittania rules the hill!

This was a great little pilgrimage, and I wish I had more time to see the battlefield, but we had spent the morning / mid-day at Ft. Niagara, so arrived a bit late. I hope to visit the area again on an 1812 tour, but who knows - if big Army intervenes I may have to see some other battlefield tours in places a lot less fun than Canada!
I hope this has given comfort to all the grognards of Scenario #8, and perhaps a little peace to see the battlefield in its present state, a modest commercial and residential district in the City of Niagara. What WAS that war about, anyway??
:)
Enjoyable travelogue, Sir! Thank you!
ReplyDeleteYou're welcome Jonathan - it was a great time made meaningful from the many times I've played Scenario #8!
ReplyDelete