
Game 2 of One-Hour Wargames Scenario #19: Blow from the Rear.
This time I used the same forces and aside from trying a couple of little changes, the same rules. But I did want to try different tactics and see what the outcome would be - this is one of the great things about the fast-play ethos, you can quickly try again instead of waiting a month for the 6-hour time block needed to play again!
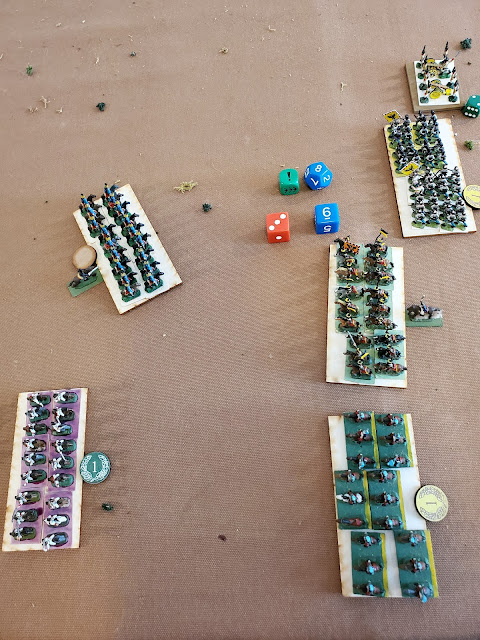
Ergo, the Russians entered between the two crossings and set up their batteries. The two Russian infantry brigades began to cross. The Austrians are far enough away that the Russian guns are at long range [over 12"] and Infantry losses have been about half what a close defense of the crossings resulted in before. Granted, the Russkies are coming over, but with less close support, they may not survive long outnumbered 2-1. I did make a mistake with the Austrian battery, which ended up being destroyed by some great Russian rolls in one turn - the empty space in the center of the Austrian line was their position...

Instead, the Russians began to threaten their flank, one Russian battery was crossing and one Infantry already had. This put the Russian attackers at at 7 to 8 defenders, but two are contesting the crossing so it's more like 7 to 6. Skillful attacks have resulted in the destruction of one Austrian Infantry and their Artillery, but the Grenadiers on the road are going to plug the hole to left of the road [I hope!].

The critical point - the hinge of the Austrian line is being bombarded by two batteries and threatened by a strong infantry brigade - desperate efforts to rally the grenzers by their general have failed, and they are two Hits away from destruction. An armchair general would ask "how did the Austrians end up with a hinge in their line anyway??" and... well, some error with the withdrawal happened, apparently.

After orders were diced and assigned, the Austrians showed some mettle and stole the Initiative from the Russkies! They took the opportunity to consolidate their position at the hinge - flatten it a bit - and charge the Hussars with the uhlans in the south.

The uhlans tie on Hits, thus have to fall back.
 The hussars have repulsed the uhlans - barely - but both units are blown.
 With discretion being the better part of valor, the Austrians consolidate their position to preserve their strength and stay ready to contest the one crossing. Their only bunch of heroes is the light battalion which departs the woods to harass the cuirassiers. They probably should have headed against the Russian infantry instead. The Russians slowly move up and continue to arrange fire support against the second crossing while one Infantry brigade prepares to cross.
 Note the Russian hussars advanced to hold the uhlans in place while their infantry close in for a firepower advantage...but s-l-o-w-l-y thanks to bad dice!


At the South end, the Austrian hussars threaten to flank the line, but are successfully dissuaded by the uhlans - what will happen here may affect Austrian efforts to retire upon and contest the second crossing.


Turn 8 ends with Austrian infantry in position to hold the line, and a gravely weakened Russian infantry in their center thanks to great Austrian shooting. That being said, the grenzers are one Hit away from destruction and it will be the grenadiers that hold that portion of the line.

Russians [Red dice] seize back the Initiative which could be critical for them!
 They Assault and destroy the grenzers easily, but took a Hit along the way.
 They then rolled a great rally for their infantry in the center and aligned their Infantry at the South end of their battle line. The Austrian position is fragile...

Turn 10 [not 9] the Austrian seize the Initiative back again!
 However, they were unable to rally and sustain themselves, and Russian Fire and Assaults crushed them - suddenly, it was all over.


 A quick measure shows that it is a flank charge by the uhlans [did I mention they're my favorite unit??], so they get a bit of a bonus.
 Both units roll poorly, but the uhlans manage to double the dice of the hussars!
 The hussars rout through an infantry brigade, causing a Hit! The uhlans can't resist the sweet smell of success [uh-oh]; they follow up and Assault the infantry. Unfortunately, the infantry were well prepared for a problem to arise, and also rolled excellently, winning a fierce Assault 5-4 [and they win ties anyway as defender].
 Taking 5 hits more then eliminates the weary uhlans - glorious, but vainglorious!?
 They would have been slammed by the supporting Artillery, also. Ok, I admit it, this was a bad decision; the uhlans should have shown the discipline to rally back into their lines and supported the infantry like they should have.


This is one of those fights that I'm always thinking that "if I just play the Austrians right, they oughta win" but I'm not getting that result. Hard to figure out if it is a constant issue with them not withdrawing fast enough, or the Russian superiority in Artillery [which was diced for using the variable force composition from the One-Hour Wargames book].
I just HAD to try it again!
For Game 3, I switched to 4x2" sabots, which felt right even though I realize that a brigade probably forms up with its reserves far enough back that it ultimately is more like a square than a rectangle. However, the 3" bases looked too cramped for the 10mm figs and I wanted to see if the 4" wide front made for a better base - more space, easier safer handling for the figs, better diorama potential. That will be for another post!
I kept the rules the same, except I streamlined unit's turning - this was playtested in earlier games on and off, and it _really_ made it easier! Also, I feel that brigade level units are more flexible, being composed of several sub units that all can maneuver separately, which is how they train. So while a brigade Unit is more cumbersome due to inertia, it is more maneuverable and less vulnerable at its flanks and rear than a single battalion, which is the right feel for grand tactical games.
I kept the forces the same. I did feel it was a bit unrealistic that ALL the corps artillery would be in one spot - the flanking force brought theirs with them this time, so one battery on the flanking operation and two at the river. I was also determined to win for the Austrians, who had had a heckuva time thus far, usually losing around Turn 10. The question for playtesting purposes is why?
- Have I not been playing them well?
- Or is the force too unbalanced in favor of the Russians?
- Or are artillery too powerful in the EC-BC rules?
Let's try once more to see!
Austrians anchor their right against the river and only even attempt to contest one bridge, right from the outset. Let the Russians cross...it is a 1:1 fight and as long as no errors are made the advantage should be with the Austrians as long as they can keep their surviving forces against the crossing!
With few targets in effective range, by Turn 7 the Russian river force still managed to destroy a couple of Austrian Infantry brigades, giving the Russians a 5-4 advantage in the most important unit type - infantry. The Austrians had managed to keep their artillery battery alive, and even damaged one Russian battery, but not enough to degrade its performance before they had to pull back. So, while there is less "hinge" in the Austrian line, which is flatter, they still took losses.

Turn 7 in the South had aggressive Russian cavalry being held off by equally aggressive Austrian cavalry. As the Austrians are on the defensive, there's really no obligation for them to even attempt a charge - the South end of the line just needs to delay the Russians, anyway.
Turn 8 saw the Austrians seize Initiative, and I was expecting to charge or maneuver first with the Russian hussars, so... they're now in trouble!


Next unit South, the Austrian hussars also could not resist a chance at slowing up the traffic jam of infantry brigades being screened by their cuirassiers. At least this served a definite tactical purpose! They charge at a slight disadvantage and roll a tie in Hits, resulting in them having to fall back.

Turn 8...wow! What a whirlwind of activity, it definitely shows the action potential of cavalry, but also that it is both risky and fragile to use. However, the intact Austrian hussar regiment is single-handedly delaying most of the advancing Russians.
 This leaves the Russians with two options - a risky charge against the hussars with a small advantage, or pully back the cuirassiers and push the infantry forward to gain much-needed ground, this being the halfway point of the game.


After orders are rolled for and assigned, the sides tie and a Respite occurs - units may rally for free and the turn ends. The Russians have lost another precious turn!

With the clock ticking, the Russians move aggressively, pushing everyone and everything forward, in part thanks to great command rolls. The flanking force's artillery manages to get flank shots on the North-facing Austrians, rolls well, and soon the combination of guns and bayonets shatters the hinge of the Austrian line!
 With plentiful forces at the river crossings, and the Austrians positioned a bit too far South and pinned down, unable to shift North to contest the crossing, they are again forced to concede.


Well, that was just plain shocking! While I was aware that the Austrian line was getting bent, I would have straightened it out to prevent the flanking fire by Russian guns, if I wasn't so distracted by cavalry excitement. Obviously, the uhlans should have rallied back, then they would have been in a position to counter the infantry assaults at the hinge of the line.
While I think it is possible for the defense to win this scenario, I must confess that it is harder than I thought, and I have trouble resisting the urge to play the defense aggressively against the flanking force, which let's remember, they outnumber.
In terms of the EC-BC rules,
- I'm thinking is that Artillery may be a bit - just a bit - too powerful. It may need its range shortened or its Hit number reduced by one, just to shave off about 15% of its effectiveness. At 30 minutes a turn, it should have a nuisance but not decisive effect, and I felt that it was a bit too long-ranged for this scenario. Granted, in OHW Rules As Written Artillery has better range than in EC-BC, but it only hits as well as skirmishers, a d6-2, averaging 1.5 Hits a turn [so ten turns to destroy a unit]. So noted for next time!
- also, options for cavalry after an Assault ends need to be streamlined and IMHO reward an Assaulter with more options, but enable a stout defender to have potential as well. Cavalry charges can be quick, and if successful full of danger, but hard to succeed in without careful preparation against a solid foe.
Scenario #19: A Blow from the Rear is a great One-Hour Wargames scenario. It has a lot more going on than you think at first, with the river barrier lulling one into some complacency on the defense. However, it is still ultimately a flanking scenario more akin to scenarios #6 and #7, which are AKA "Flank Attack 1 & 2".
It would be interesting to play all three of these scenarios with that in mind and do a compare / contrast!
Another fascinating AAR and demo of a really great set of rules. It seems as if both the square and rectangular sabot bases worked fine? Do you feel any need to magnetise the sabots, or does having the figure stands on loose work perfectly well?
ReplyDeleteThanks Noel! Square v. rectangle is largely a matter of preference, I think. I'm not keeping these figs on the cardboard bases but going to mount them on the single bases. I should probably mount them for Volley and Bayonet, the 3x3" bases, but ultimately I am leaning towards the larger 4" bases as fitting the figures on better and having more possibilities for interesting "dioramas" on the base. Magnets are also probably too powerful for little bases of 9mm figs to be pulled off of anyway.
ReplyDeleteJust about to post again about these latest changes, so stop by again soon!